The post How to Use Recast Builder to Automate the Force Reinstall of ConfigMgr Clients appeared first on Recast Software.
]]>We already have actions available to uninstall the client and repair the client. However, what if you want to do a complete, fresh reinstall of the client? This post will cover how to leverage the Recast Builder to create and run the installer using the Recast Agent and Agent Gateway.
The first step is to create a PowerShell script block that will force the reinstall of the client:
The code below will force the reinstall of the ConfigMgr client; copy and paste into your code editor as we will need to make changes before adding it in as a Recast Builder Action.
<#
.SYNOPSIS
Force SCCM Client Reinstallation
.DESCRIPTION
This script will check to see if the device is on the local intranet or on the internet
to determine the best method of installing the client and then force out a reinstall of the client
You can see how to install the client through the CMG from this article:
https://learn.microsoft.com/en-us/mem/configmgr/core/clients/deploy/deploy-clients-cmg-azure
.LINK
#>

# Function to test to see if the device is on the Internet or Intranet
Function Get-CMGStatus {
    <#
    .SYNOPSIS
    Queries SCCM connection type to determine if the PC is connected to a CMG
    #>
    $ClientInfo = Get-WmiObject -namespace rootccm -Class ClientInfo
    If($ClientInfo.InInternet) {
        Return $True
    }
    Else {
        Return $False
    }
}

# Variable Declarations
$CloudMP = 'https://CONTOSO.CLOUDAPP.NET/CCM_Proxy_MutualAuth/72186325152220500' # Source Management Point
$CloudCCMHOSTNAME = 'CONTOSO.CLOUDAPP.NET/CCM_Proxy_MutualAuth/72186325152220500' # Internet Based Management Point
$SiteCode = 'ABC' # Site Code
$SMSMP = 'https://mp1.contoso.com' # Initial Management Point
$AADTenantID = 'daf4a1c2-3a0c-401b-966f-0b855d3abd1a' # Entra AD Tenant Identifier
$AADClientAppID = '7506ee10-f7ec-415a-b415-cd3d58790d97' # Entra AD Client App Identifier
$AADResourceURI = 'https://contososerver' # Entra ID Server App Identifier

# Perform installation depending on result from Get-CMGStatus
If ($(Get-CMGStatus)) {
    Start-Process -FilePath 'c:windowsccmsetupccmsetup.exe' -ArgumentList  "/nocrlcheck /forceinstall /mp:$CloudMP CCMHOSTNAME=$CloudCCMHOSTNAME SMSSITECODE=$SiteCode SMSMP=$SMSMP AADTENANTID=$AADTenantID AADCLIENTAPPID=$AADClientAppID AADRESOURCEURI=$AADResourceURI" -Wait
} else {
    Start-Process -FilePath 'c:windowsccmsetupccmsetup.exe' -ArgumentList "/forceinstall /mp:$SMSMP SMSSITECODE=$SiteCode" -Wait
}
Next, open your ConfigMgr console and navigate to Administration < Cloud Services < Cloud Attach and then open the properties for CoMgmtSettingsProd and view the Enablement tab.
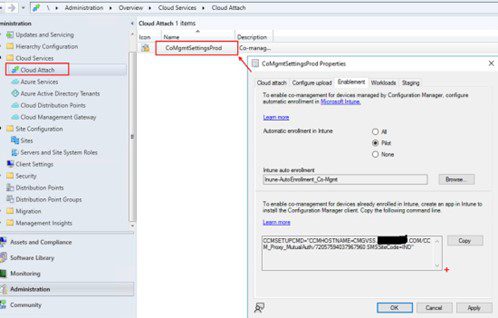
Here you will find the correct server name within the quotations with the value for the $CloudMP and $CloudCCMHOSTNAME; these are the same values. You will use this in your PowerShell script.
Log into the Entra Admin Portal and retrieve the following values for the enterprise application for your ConfigMgr CMG service:
- AAD Tenant ID
- AAD Application ID (Client ID)
- AAD Resource ID
as shown in the example PowerShell script.
In the PowerShell script, replace out the variable values as specified in the script:
- $CloudMP and $CloudCCMHOSTNAME = Value retrieved from CoMgmtSettings in Step 2
- $SiteCode = your site code
- $SMSMP = your on-prem management point
- $AADTenantID = Your Entra Admin Tenant value
- $AADClientAppID = The client ID for your ConfigMgr CMG Service Enterprise App
- $AADResourceURI = The uri for your ConfigMgr CMG Service Enterprise App
Create Recast Builder Action
The next step is to create that action in the Recast Builder. From within the ConfigMgr Console, Navigate to Assets and Compliance < Overview < Devices and right-click on any device and then choose Recast Automation < Recast Builder.
Click the Plus sign for a New Action.

Click the Start Node in the Builder Window and in the area below. Give it a name that you will recognize.
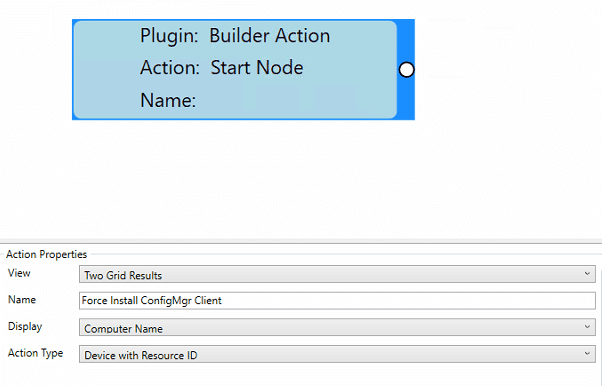
In the right-hand pane, expand out the PowerShell area and drag in the “Run PowerShell Script Block” Building block.

To draw the arrow, click and drag from the circle on the starting node and point to the new node that you added for the PowerShell script block.
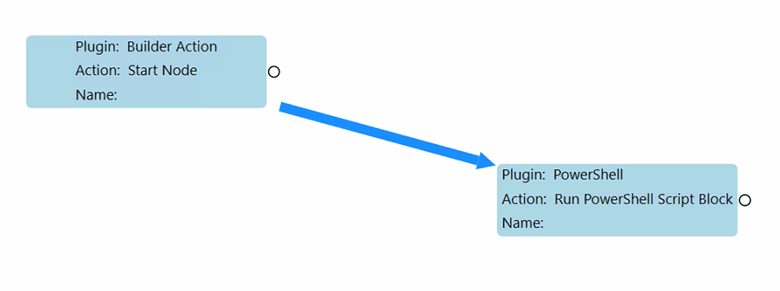
While the arrow is highlighted, look down in the box in the bottom left and you will see some parameters. Select the Script parameters and copy and paste your code into this box.

Save your new action.
Time to Test Automation of ConfigMgr Client Force Reinstall
- Select a device from within your ConfigMgr Console and then right-click on it and then click Recast Automation < Recast Runner.
- Select your newly created Action and click Next.
- From here you can Run Immediately or you can Schedule it and then Click Finish.
Please test this Action and let us know the results.
Final Thoughts on Automating ConfigMgr Client Reinstallation
Automating the force reinstall of ConfigMgr clients is not just about saving time; it’s about enhancing your IT infrastructure’s resilience and reliability. By leveraging the steps outlined, you can ensure that your ConfigMgr clients are always running optimally.
Note: The ability to automate the force reinstall of ConfigMgr clients using Recast Builder is just the beginning. Explore Builder and Runner further to unlock the full potential of your endpoint management capabilities.
The post How to Use Recast Builder to Automate the Force Reinstall of ConfigMgr Clients appeared first on Recast Software.
]]>The post Automation Simplified with Recast Software appeared first on Recast Software.
]]>Automating repetitive tasks allows SysAdmins to get back to the vital work on their plates. Make life easier with the Right Click Tools automation platform, Builder. Builder enables you to create custom actions that automate an endless combination of tasks.
Custom Workflow Automation at your Fingertips
Right Click Tools includes a complete workflow automation suite that lives right within your ConfigMgr console. The Builder tool, for one, is a framework for creating your own Right Click Tools. It has all the Right Click Tools actions available at your fingertips. While learning scripting languages can be a long and painful journey, Builder eases the burden of learning syntax or keeping code perfectly tidy. Builder enables this by functioning as a visual automation creation tool. You can see your full flow graphically and customize all of the parameters.
However, if you have some scripting knowledge under your belt, you can also merge the Right Click Tools actions with custom PowerShell scripts.
What can be customized with Builder? You can fully customize everything from input parameters, conditional responses, loopback steps, and more — over 450+ Right Click Tools actions across dozens of categories. Any of the automations that you build can be saved and shared with other Right Click Tools users, or you can even import them into other environments that you manage (looking at you, Managed Service Providers). Whether you need to run the automation right now or on a schedule, Recast Software has you covered.
Where to Start your Automation Journey
The sheer number of actions that you can utilize to create automations in Builder can be intimidating at first. That is why we created templates to help you get started on your automation journey. The pre-built templates take care of some common issues you may be looking to automate away, like decommissioning old user accounts or restarting a device with a reboot pending. You can also build off of the templates.
Templates also help you understand how the flows work, as you can visualize the entire flow when viewing the template. Check out and download the templates here to get a head start in your automation journey.
Right Click Tools Runner
Now that you have created your shiny new workflow automation in Builder, how do you run it? That is where Runner comes into play. You build your automation in Builder and run it with Runner.
Once your automation is set up to your liking, you can run Runner against the appropriate object—whether it be a device, user, or collection—and kick off your action.
You will also get the option to schedule the action if needed. This can be a great way to run certain automations that should only be run after hours. Perhaps you need to restart all devices that are pending a reboot. You could run that action against a collection and schedule it to run after hours so that any devices that are currently pending a reboot will restart without any downtime for your end users.
Runner and Builder in Action
Now let’s dive into a quick example of how we can build our own custom automation to add or remove an account from the local administrator group. Luckily, we can use these actions at scale just like the other Right Click Tools so if we need to mass remove an account, we can knock it out across multiple devices at a time.
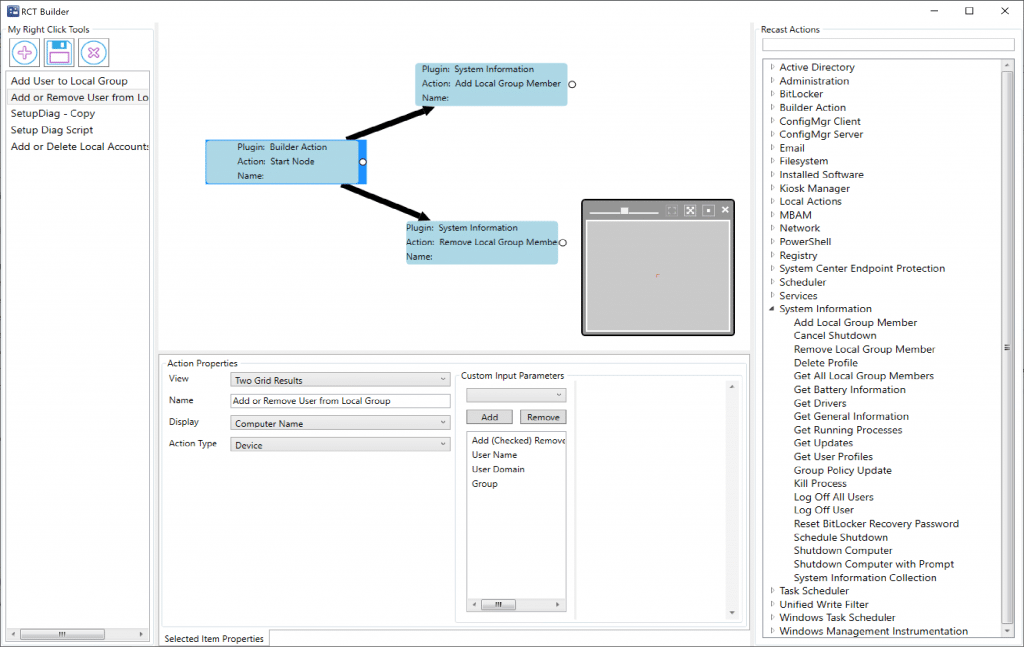
On the left you have a list of the Custom Actions you’ve created. The Middle area is your “Work Board”. You start with a single “Starting Point”, where you can create parameters, and pick the output you want to display. The Right side contains the list of actions you can choose from. Find the one you’re looking for, drag it from the options pane to the work board, draw your arrow and apply the parameters. No code needed. If you’re familiar with the Right Click Tools, then you’re already part way there.
Here are a couple examples. While these are simple, it does give you a glimpse of the possibilities. Example 1 is a tool that will Add a user to a local group or Remove a user from a local group. We’ve set the default local group as administrators. Scenario, you need to grant someone local admin rights on a workstation (or group of), for a manual software install. Then when they are done, you want to remove them again.
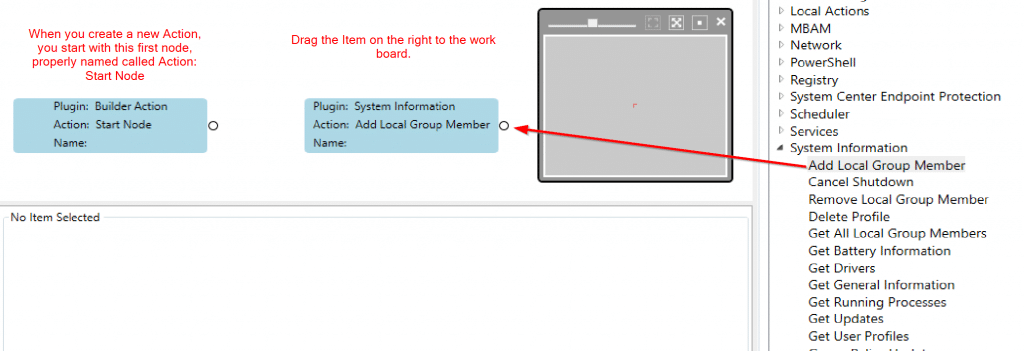
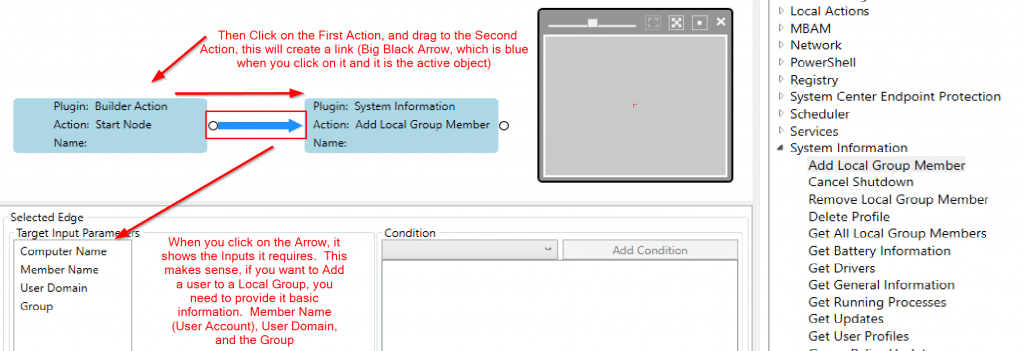
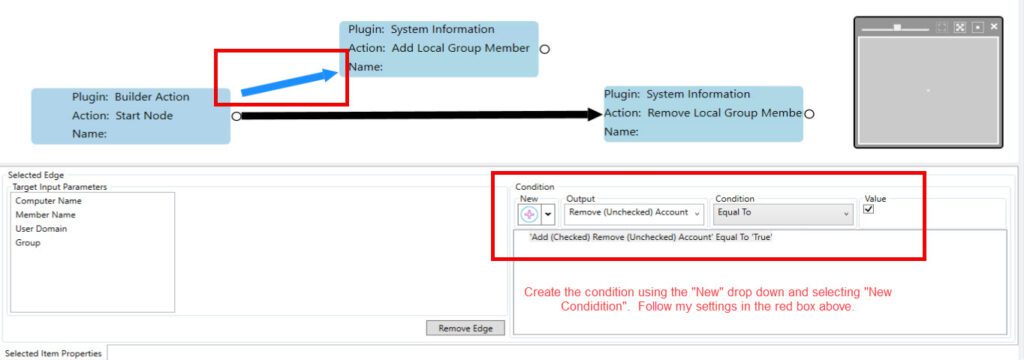
We created a new Builder Template, drag the “Add Local Group Member” Action onto the board, then drag an arrow from the Start Node to the Add Local Group Member action. When you click on the Arrow, it turns blue, so you know it’s the active object and shows you the required information that needs to be provided. This means this information will need to be created on the Start Node. Let’s create Parameters that the Right Click Tool Admin User will provide as input.
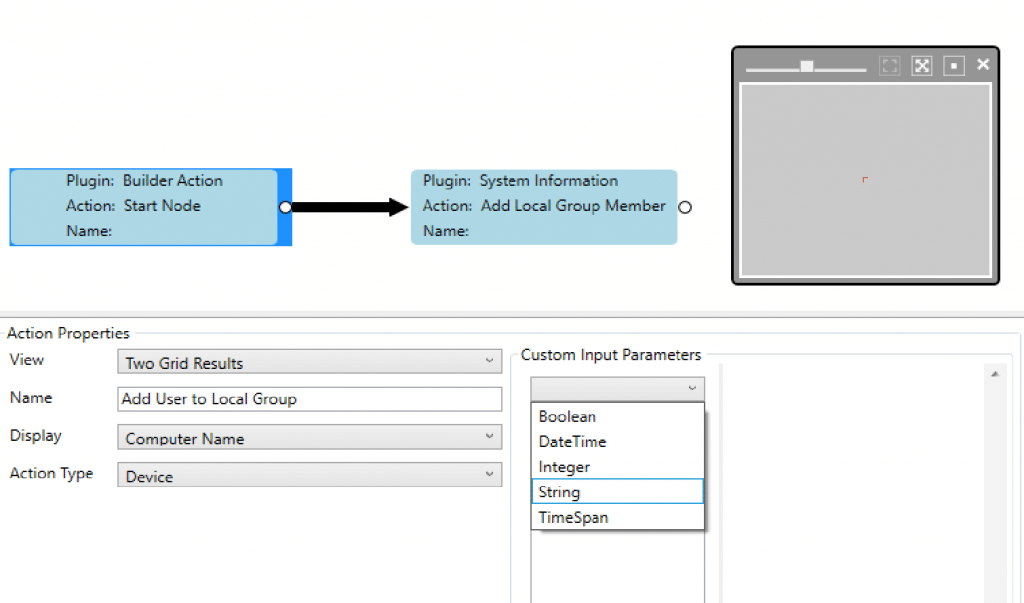
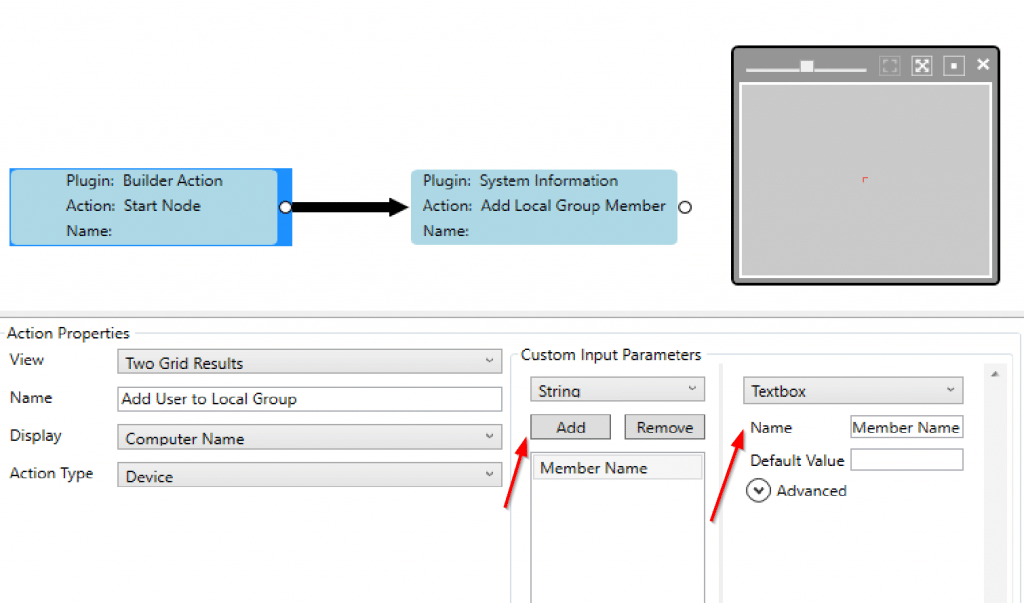
So we’ve added an Input Parameter, type string and called it Member Name, we’ll repeat this process for the other required fields. For the next two fields, I’ll also add default values, since most of the time, they will probably be what you want to input anyway.
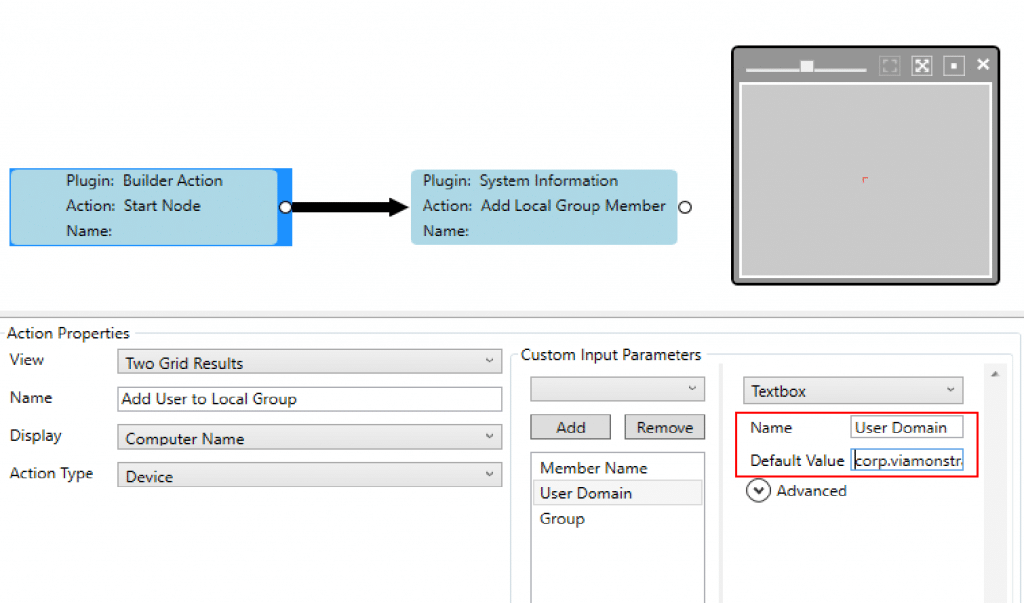
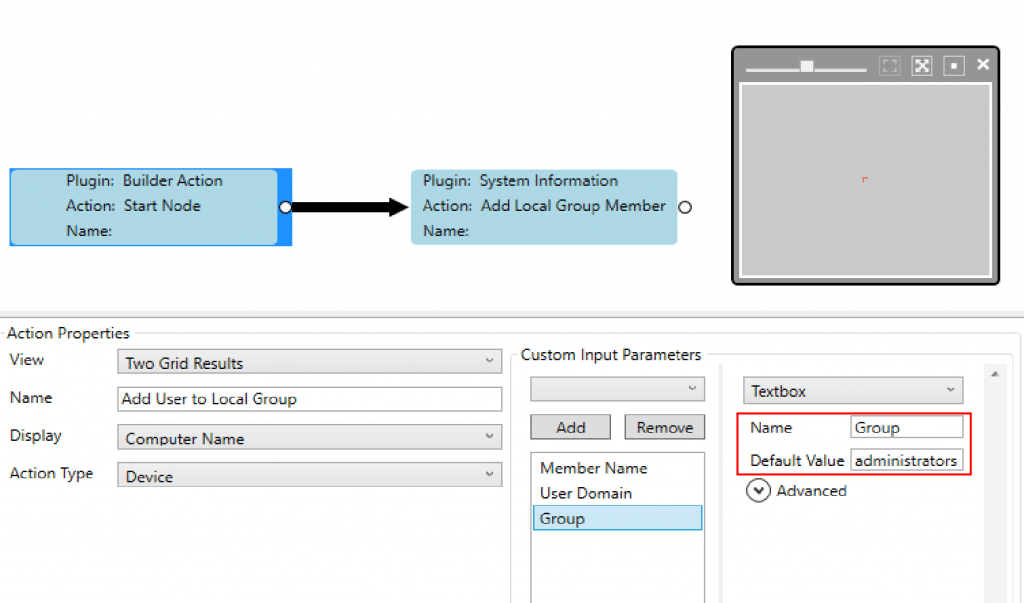
Ok, now that we’ve made our input parameters, it’s time to map them.
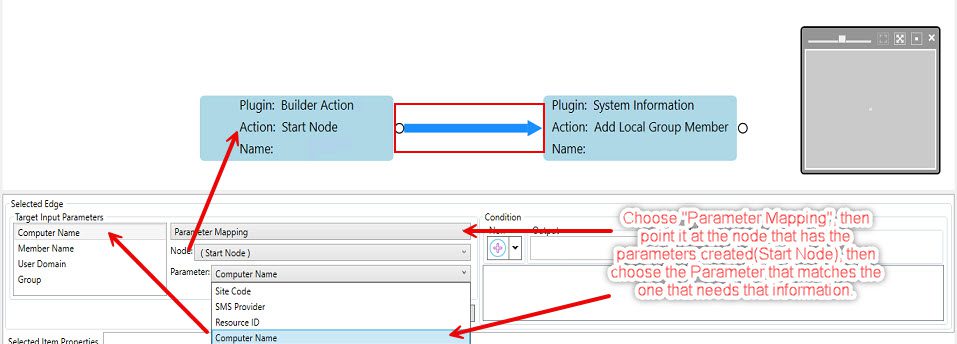
Once you click on the Arrow, it will turn blue and show the list of Required Input Parameters. Click the Required Parameter (in this case Computer Name) and match it to the Available Parameters. Now that we have that done, lets finish connecting the Parameters.
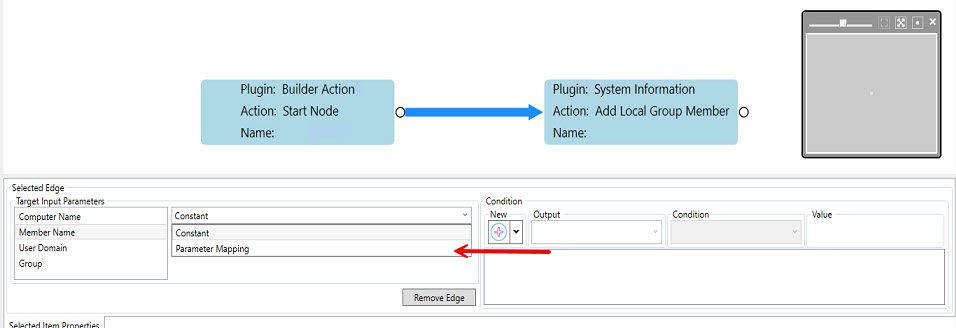

Alright, at this point, we have our parameters all mapped and this tool Should work… so let’s try it out!
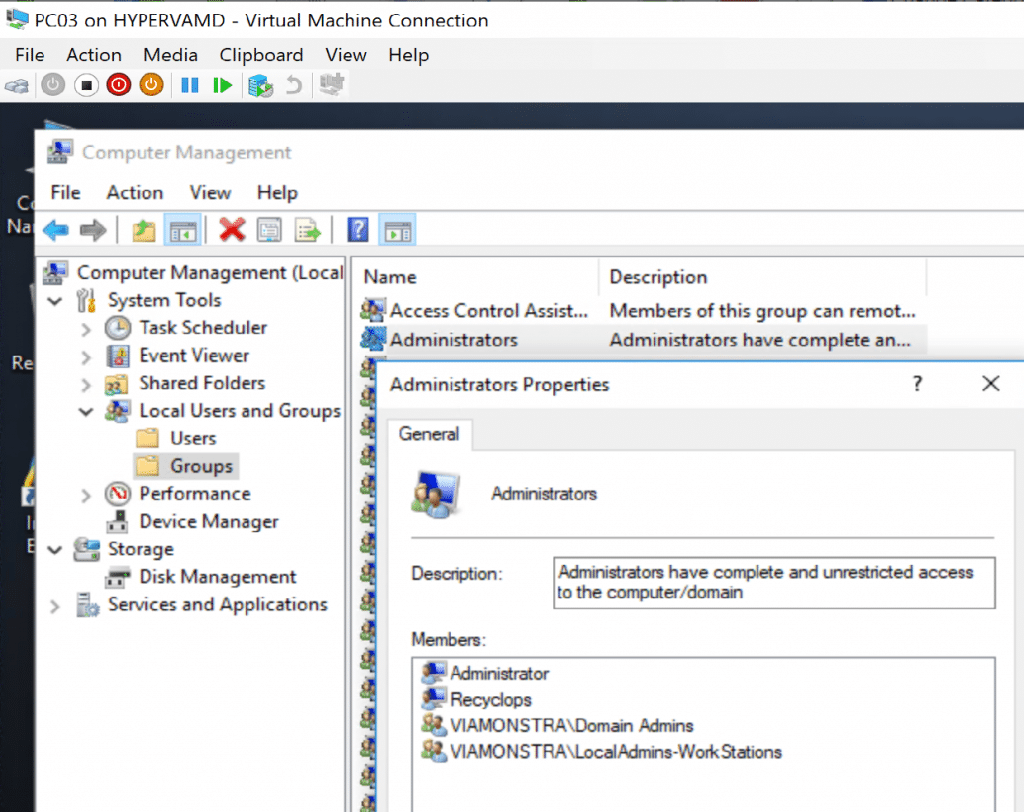
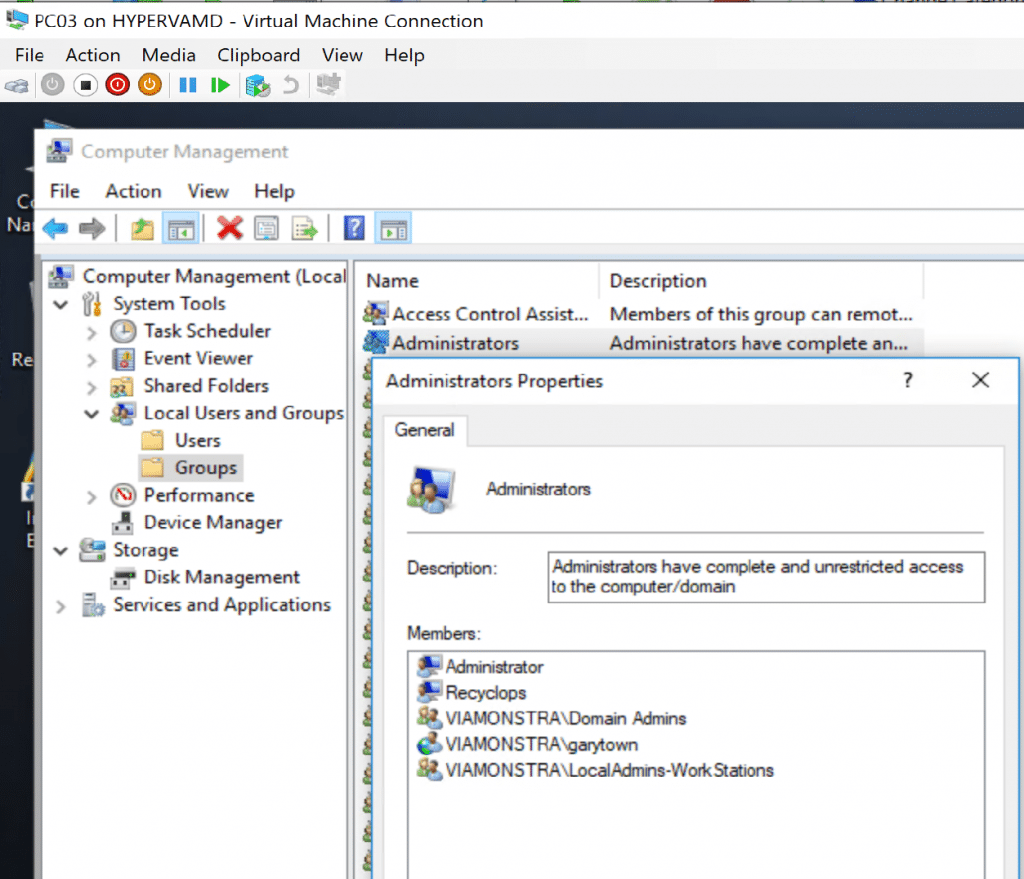
On our test machine PC03, let’s see who is in the Local Admin Group:
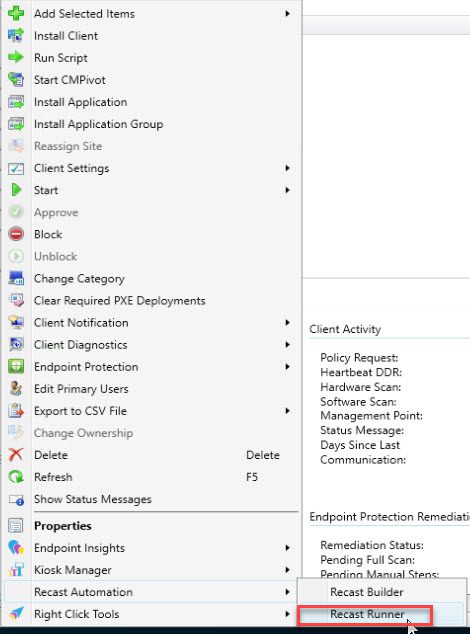
From the Console, Right Click -> RCT Runner
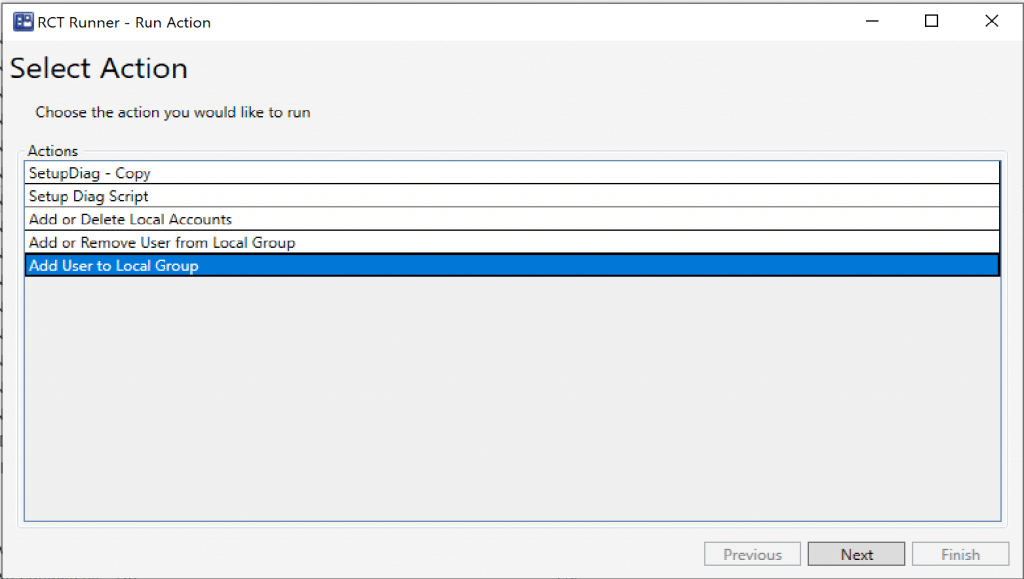


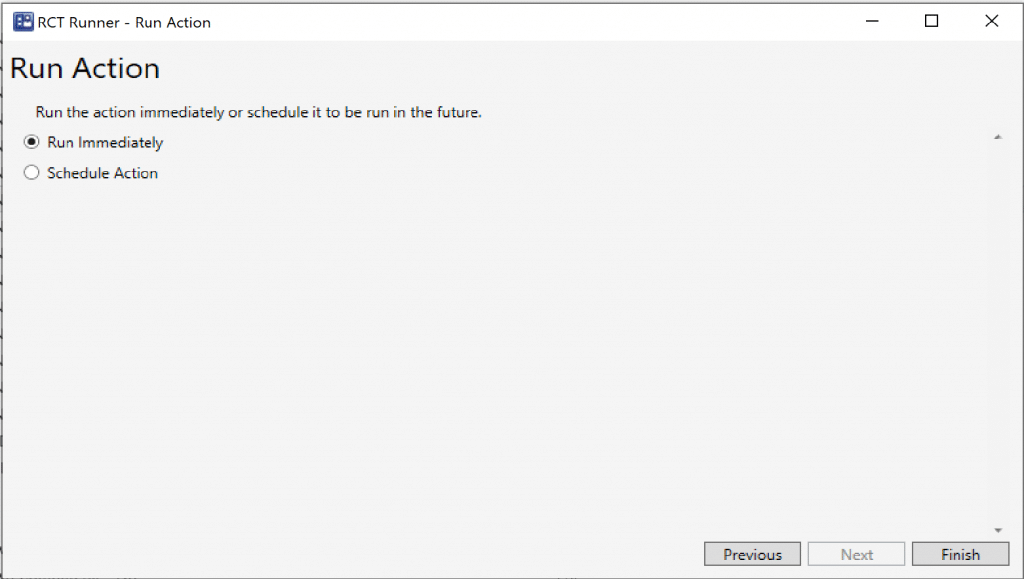
Then click Finish and see what happens. Looks like it worked!
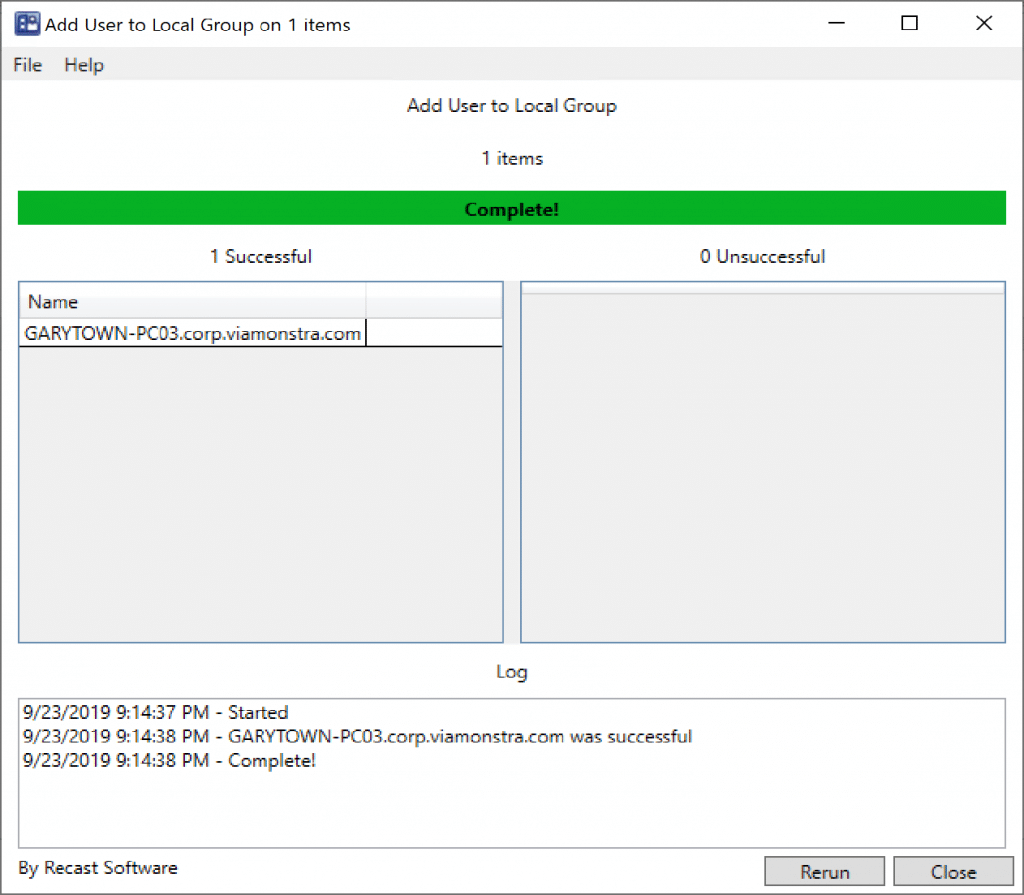
And guess what, the Dialog didn’t lie. The Machine shows the account was added to the Administrators Group:
Ok, so now we confirm that part work, let’s go back and add the “Remove” feature.
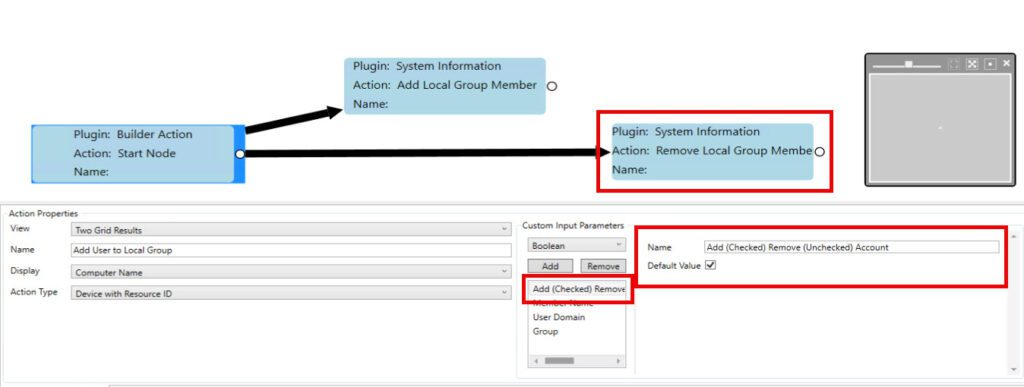
We added the “Remove Local Group Member” and added the “Arrow” to connect the Start Action to the Remove action. The setup is the same as the “Add Local Group Member”, it requires the same parameters. But now we need a way to let the Runner know which “Path” to take, Add or Remove. So we’ve added a Boolean (Check Box) to the form and named it accordingly. Then we just have to set the conditions on each action. Run “Add” if Checked, Run “Remove” if UnChecked.
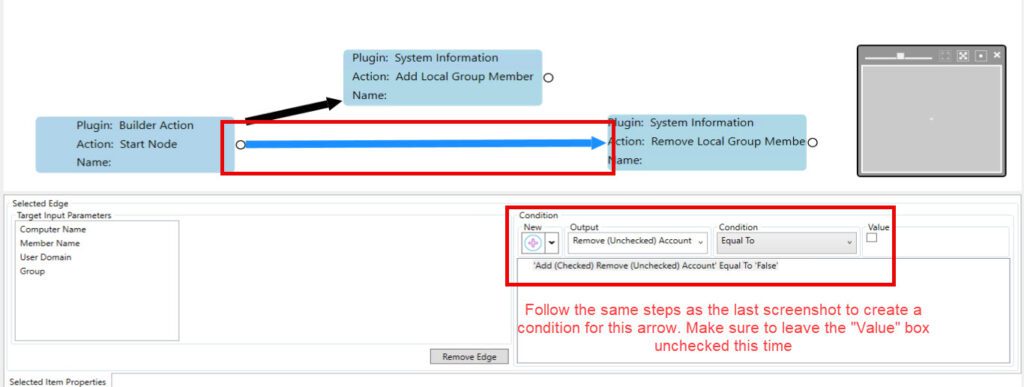
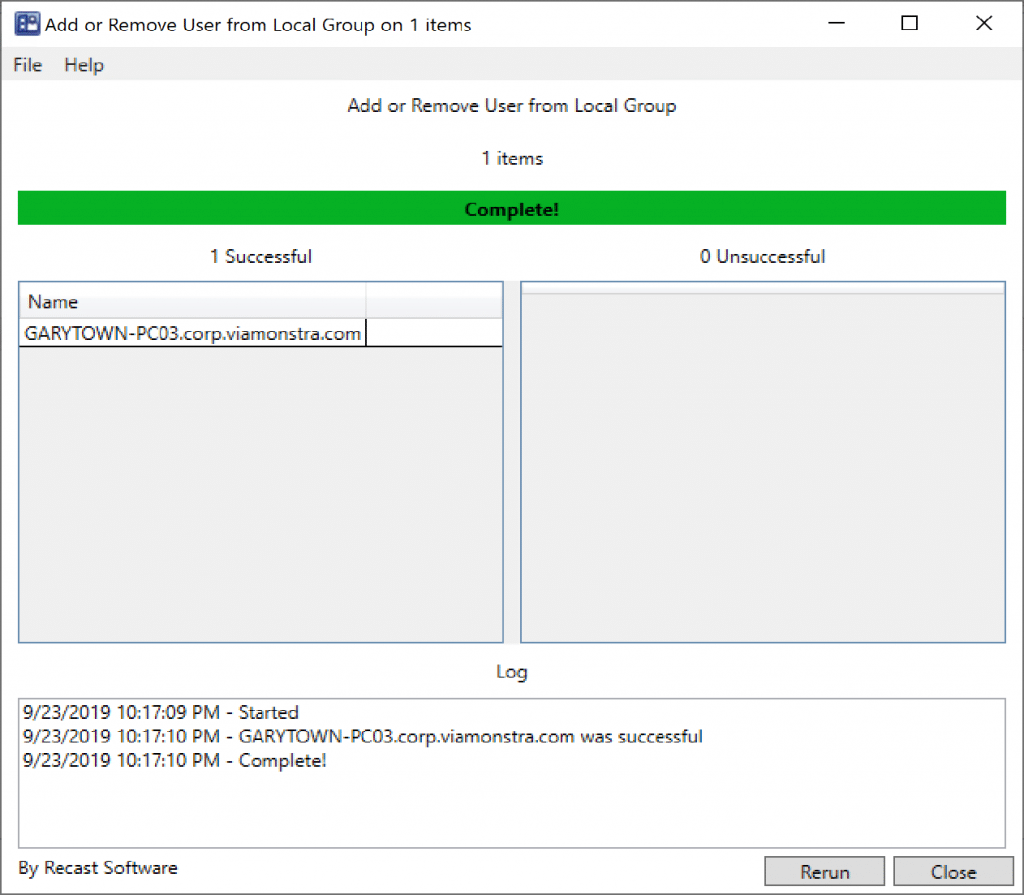
Ok, now let’s run it again, but this time we use it to remove the account.

Oh good. It worked.
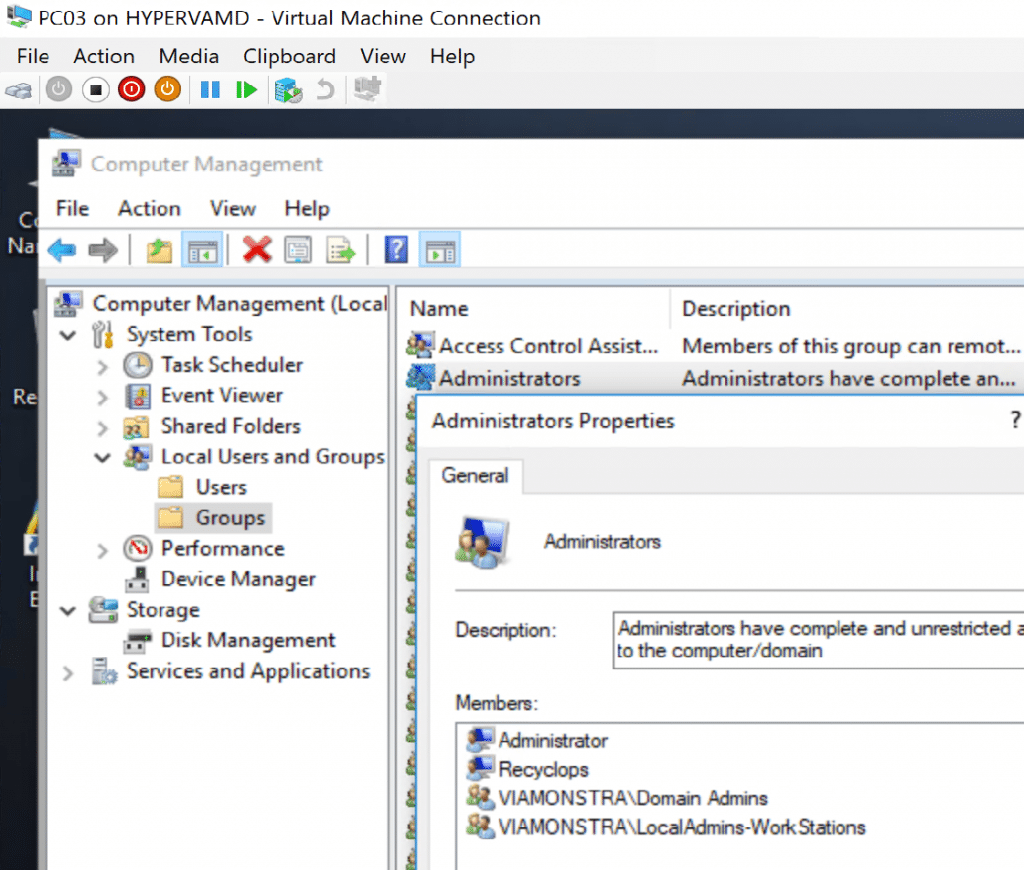
Double checking the computer. Yep, garytown is now removed from administrators:
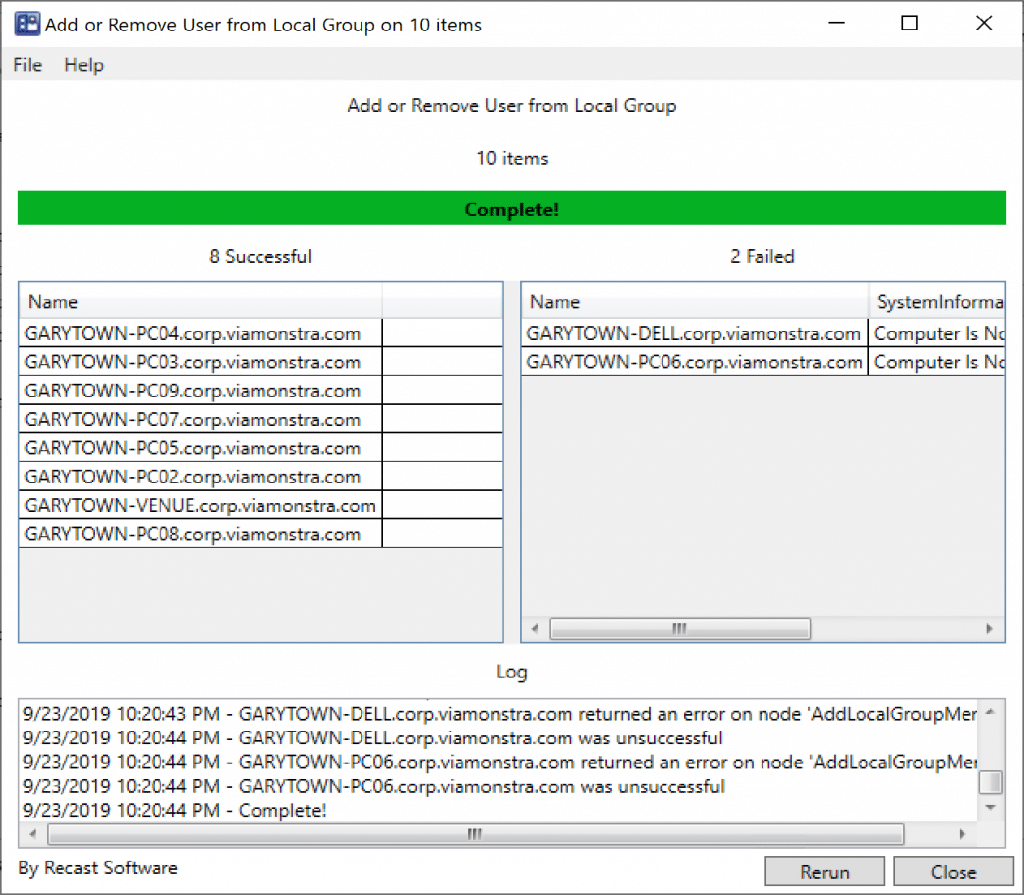
And Confirmed it works on entire collection, as long as the machines are on:
As we just demonstrated, RCT Builder has potential for you to automate tasks, or create new actions that might be unique to your environment.
Learn more about endpoint management software and Right Click Tools automation.
The post Automation Simplified with Recast Software appeared first on Recast Software.
]]>The post Kiosk Manager in Right Click Tools appeared first on Recast Software.
]]> Kiosks are widely used in healthcare, education, and factory settings, while also serving valuable purposes in other industries as well.
Let’s look at how to set up and use Kiosk Manager, a slick Right Click Tools feature.

Set Up Kiosk Manager Template
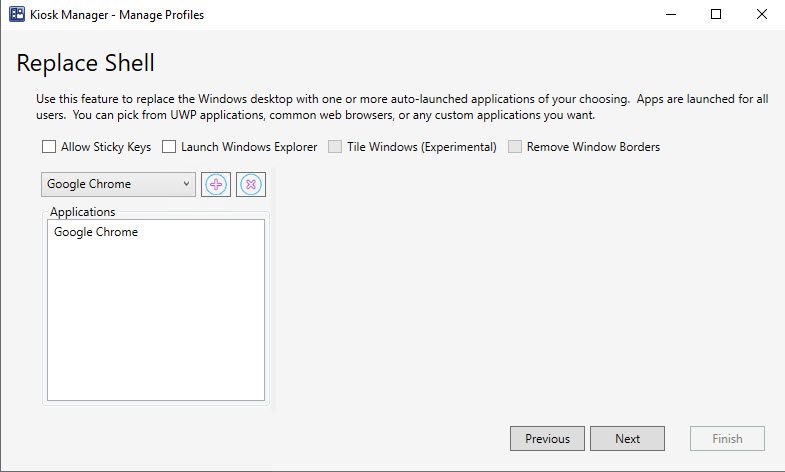
First, create a Profile using “Manage Profile”.


For this example, lets display all of the options.



Apply to a Machine
Now that we have a Template, let’s apply it to a machine and see what happens. Right click on the machine, and go to “Apply Profile”.


So we apply the Library Profile, Deploy it Immediately, and it will reboot the machines to apply, which is also a good reason to schedule it.

After the reboot, the machine performs the auto-logon with the account information provided. It then launches the replacement shell, in this case, Chrome.

So, it had some of the desired effects, but since we’re using the whitelist, it only shows the content of the items added to that list. Apparently many of the graphics are hosted under a different domain name. Open “Developer Mode” in Chrome, and grab the other URLs that are needed, and an update to the WhiteList Tab in the Template.

After you make a change to the template, you have to RE-Apply it.

Now the machine will apply the updated template, reboot, and have your changes applied.

Kiosk Manager Active
There we go, that looks better. Auto Logon to Chrome Browser with the Default Website set to RecastSoftware.com and the user is blocked from making modifications. If the Kiosk is left unattended for 30 minutes, it reboots to a fresh state.
To get the most out of Kiosk Manager, leverage GPO to set lock screen settings, power options, and other control features.
Learn more about Right Click Tools here or reach out to our team today to discuss your specific environment and needs.
Additional Kiosk Manager Posts
- Top Use Cases for Locking Down Devices in ConfigMgr (Using Kiosk Manager)
- Customer Q&A: Lock Down Computer Labs for State Testing
- How to Create Digital Signage Players in ConfigMgr (using Right Click Tools)
- Recast Kiosk Deployment via Task Sequence
The post Kiosk Manager in Right Click Tools appeared first on Recast Software.
]]>The post Taking Endpoint Management to the Next Level: Introducing Agent Gateways appeared first on Recast Software.
]]>An Agent Gateway is an on-premises component that serves as a bridge between your Recast Management Server (RMS) and your Recast Agents. It allows you to manage your endpoints at scale by providing a secure communications path for agent authentication, authorization, and licensing, directing Recast actions to agents, extending agent connectivity to the internet, and connecting agents with other Recast components.
One of the notable highlights of the Agent Gateway is its ability to connect internet-enabled devices that are not on your local network. This eliminates the need for a Cloud Management Gateway (CMG), allowing you to execute Recast actions against these devices with ease. And if you’re worried about the number of agents you can connect, there’s great news – you can add as many Agent Gateways as you like, effectively removing any limit to the number of agents that can connect to your Recast Management Server (RMS).

Why Agent Gateways instead of Fast Channel?
Why would you opt for Agent Gateways over the traditional method of Fast Channel via CMG? Agent Gateways offer faster executions of Right Click Tools actions against internet-connected devices compared to the Fast Channel. This optimization means quicker response times and enhanced productivity for your IT team.
A Brief History of Off-Premises Endpoint Connectivity
Let’s step back to the landscape before Right Click Tools. Traditionally, admins had to set up a CMG to manage devices over the Fast Channel. However, this process was inherently limited by the lack of built-in tools in ConfigMgr, making device management a labor-intensive and inefficient process.
The introduction of Right Click Tools brought some respite. Admins could utilize most of the Right Click Tools on their off-site devices connected over the Fast Channel. However, the process of running these actions over the Fast Channel remained slower than desired.
Moreover, before Version 5.0, all Recast Agents connected directly to the Recast Management Server (RMS). This created a potential bottleneck, especially in environments with a large number of endpoints, leading to decreased system efficiency.
With the release of Recast Version 5.0, you now have the power to connect Recast Agents to an Agent Gateway, which in turn connects back to the RMS. This additional layer enhances performance while also ensuring you can scale up your operations without worrying about limits. You can add multiple Agent Gateways that connect back to the RMS, efficiently eliminating the soft limit of how many agents you can have.
Agent Gateways Unlock Speed and Remove Limits
In summary, the new Agent Gateways feature is a game-changer, offering faster execution, greater flexibility, and the ability to manage an unlimited number of agents. Say goodbye to the former constraints and embrace the next evolution of endpoint management with Recast Software.
The post Taking Endpoint Management to the Next Level: Introducing Agent Gateways appeared first on Recast Software.
]]>The post Transform Your SysAdmin Workflow with the Software Update Deployment Status Dashboard appeared first on Recast Software.
]]>Improve Vigilance and Accelerate Remediation
SysAdmins must continually report, remediate, and then repeat. The SUDS Dashboard accelerates and improves this continual process, providing an environment-wide view of update compliance while allowing for targeted reporting and action.
- Reporting: Comprehensive and Customizable
The SUDS Dashboard generates detailed reports on update compliance, enabling you to visualize the status of each update classification in your environment. With its extensive filtering options, the dashboard allows for both broad overviews and granular targeting, ensuring you get the information you need quickly.
- Remediation: Identify Devices in Error
Once you’ve identified non-deployed updates, the SUDS dashboard paired with Remote Software Center identifies devices that are in error and those only needing a reboot. Finding these devices has historically frustrated SysAdmins. With SUDS dashboard, you can find those pending devices and reboot them. If an error code exists, teams can also then troubleshoot the error code that initially caused the installation failure.
- Repeat: Continuous Monitoring and Action
The SUDS Dashboard supports continuous monitoring of your environment, making it much easier to identify and address non-compliant devices. The dashboard displays devices according to their compliance status, allowing you to take appropriate action as needed.

Actionable Results via Software Update Deployment Status Dashboard
The Software Update Deployment Status Dashboard within Right Click Tools Enterprise also enables actionable results. For instance, you can access Remote Software Center to install missing updates unearthed through the dashboard. You select the devices that need updating, right click them, and open Remove Software Center from the Client Tools section. From Remote Software Center you can immediately kick off the updates on all of the devices simultaneously.
You can also utilize dozens of other helpful Right Click Tools actions from within the SUDS dashboard. Consequently, this dashboard creates much more than pretty data—it enables you to boost your software update compliance without ever needing to remote into a device or bug the end user to run their updates.
Conclusion: An Invaluable Assist Enabled by the Software Update Deployment Status Dashboard
The powerful reporting, remediation, and repeat capabilities, coupled with its user-friendly interface, make the SUDS Dashboard a must-have for any SysAdmin looking to streamline their software update management process. Don’t waste more time manually managing updates. Reach out to learn more about the Software Update Deployment Status Dashboard and the many other features of Right Click Tools Enterprise.
Additional Information
Check out this blog post that provides a step-by-step look into utilizing the SUDS dashboard.
The post Transform Your SysAdmin Workflow with the Software Update Deployment Status Dashboard appeared first on Recast Software.
]]>The post No Need to Switch Endpoint Management Software appeared first on Recast Software.
]]>Right Click Tools and Endpoint Insights Enhance your Endpoint Management Software
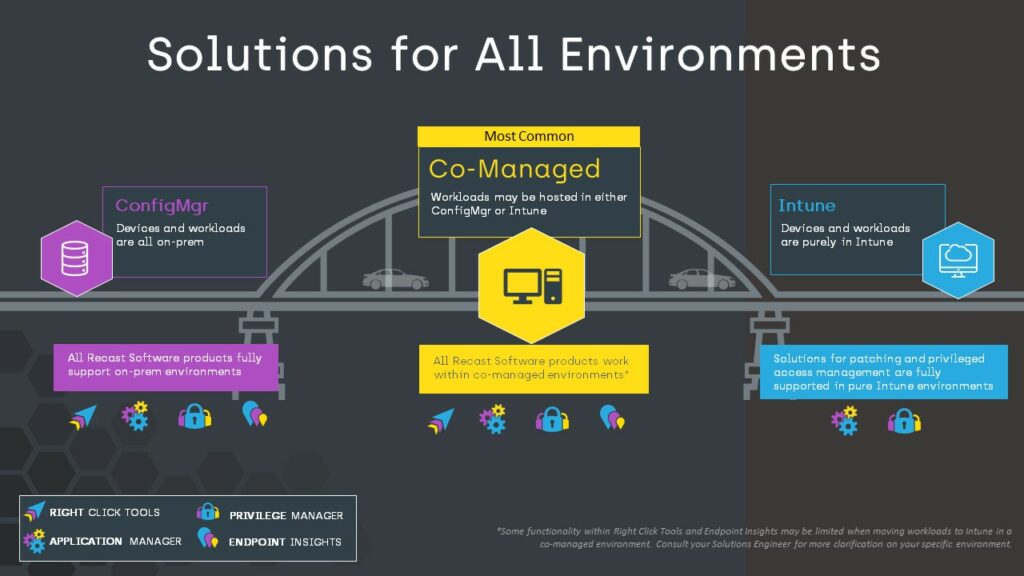
Right Click Tools and Endpoint Insights are two powerful add-ons for Microsoft Configuration Manager that can supercharge your endpoint management capabilities. These tools are specifically designed by SysAdmins for SysAdmins to enhance ConfigMgr’s functionality, making it easier to manage and monitor your organization’s IT infrastructure. Importantly, both also work in co-managed environments.
Right Click Tools: Power and Ease
Right Click Tools is a ConfigMgr extension that integrates seamlessly with ConfigMgr, adding a powerful layer of functionality and ease-of-use to your existing management console. With Right Click Tools, you can:
- Easily perform actions directly—both simple and advanced—from the ConfigMgr console, reducing the need for time-intensive digging in ConfigMgr or custom script writing.
- Streamline troubleshooting and maintenance tasks with built-in automation and scripting capabilities.
- Enhance security and compliance by quickly identifying and resolving potential issues, such as outdated software or misconfigured settings.

Endpoint Insights: Visibility and Health
Endpoint Insights is a comprehensive comprehensive data and reporting tool that provides deep visibility into your endpoint environment. By aggregating data from ConfigMgr and Active Directory, while also adding novel data from other sources, Endpoint Insights offers:
- A unified view of your endpoint environment, making it easy to identify trends, monitor performance, and ensure the health of your infrastructure.
- Clear reports that allow you to track the metrics that matter most to your organization.
- Proactive notifications to help you stay ahead of potential issues and maintain a healthy, secure endpoint environment.
Benefits of Staying with Microsoft Configuration Manager
By enhancing your existing ConfigMgr setup with Right Click Tools and Endpoint Insights, you can avoid the hassle and cost of switching vendors, while still enjoying a powerful, easy-to-use, and efficient endpoint management ecosystem. Some key benefits of staying with ConfigMgr include:
- Seamless integration: Right Click Tools and Endpoint Insights are specifically designed for ConfigMgr, ensuring a smooth and hassle-free experience. Their integration with the existing Microsoft ecosystem makes it much easier to manage your IT environment without introducing new complexities or learning curves.
- Familiarity: Your IT team is already familiar with ConfigMgr, so there’s no need for extensive retraining or learning a new system.
- Cost savings: Avoid the expenses associated with switching vendors, such as licensing fees, implementation costs, and potential downtime. By leveraging your existing Microsoft licenses and infrastructure, you can save on the costs of new software licenses, hardware requirements, and the additional training and support needed when adopting a new solution.
Conclusion: No Need to Switch Endpoint Management Software
You don’t have to switch vendors to enjoy a powerful and easy-to-use endpoint management ecosystem. By leveraging Right Click Tools and Endpoint Insights, you can enhance your existing Microsoft Configuration Manager or co-managed setup and enjoy a healthy, impactful endpoint management system without the hassle and expense of switching vendors. Learn more about Right Click Tools and Endpoint Insights or reach out to our team here.
The post No Need to Switch Endpoint Management Software appeared first on Recast Software.
]]>The post Letter to the Chief Technology Officer appeared first on Recast Software.
]]>I understand that your organization is currently using ConfigMgr (SCCM) as your endpoint management solution, and you are constantly striving to keep up with compliance and safety regulations. What if we told you that your SysAdmins already have a solution for you? As users of Right Click Tools Community, your SysAdmins love the ease and power that Right Click Tools brings to your ConfigMgr environment. They also know that Right Click Tools Enterprise would be a boon for powering up your current stack.
- Microsoft compatibility: Right Click Tools is a plugin for ConfigMgr that integrates seamlessly into your existing Microsoft environment (and licenses). It enhances your current endpoint management architecture without requiring any replacement. When activating Right Click Tools Enterprise, your company will not have to invest substantial time and money into integrating and learning a new endpoint management solution.
- Boost security compliance quickly: While often small in numbers, compliance teams are tasked with managing complex environments. Right Click Tools Enterprise simplifies the management and monitoring of LAPS, Bitlocker encryption, and software update compliance, while auto-generating compliance reports for management. This helps to better protect your company against data breaches and cyberattacks.
- Reduce disruptions: When ConfigMgr tasks fail, it puts a serious strain on productivity across the organization. Not only is IT output stalled while logs and other root causes are explored, but anyone waiting for a new computer, tech support ticket, or new image has their productivity hamstrung as well. Right Click Tools Enterprise’s Status Message Tools enables admins to jump directly to the causes of trouble in 24 different places around the console, so that they can address issues remotely and efficiently. Additionally, Remote Software Center reduces end user disruptions, decreases the time spent by SysAdmins on patching, and hardens your environment.
- Automate tedious and error-prone tasks: ConfigMgr is one of the most complicated products Microsoft sells, and is used by an organization’s best, brightest, and most experienced (and expensive!) IT resources. Significant organizational resources can be saved by giving your highly skilled professionals the tools they need to offload and automate complex, repetitive, and challenging tasks. Right Click Tools Builder allows the creation of custom automation tools on a grand scale, leaving your most skilled IT resources with more time to better manage the forward march of your technology and security threats.
Over 14,000 organizations worldwide use Right Click Tools, and our 2022 Net Promoter Score of 77 significantly surpasses the software net promoter average of 40. Our enthusiastic customers demonstrate that you can trust our software to provide the impact you need.
Your SysAdmins are already buzzing over Right Click Tools Community and can’t wait to level up with Right Click Tools Enterprise. If you’re curious or would like to chat about this upgrade, feel free to tap into the insights of your SysAdmins or give us a shout via email or web.
Regards,
Recast Software
The post Letter to the Chief Technology Officer appeared first on Recast Software.
]]>The post Compliance Tracking with Trend Dashboards appeared first on Recast Software.
]]>SysAdmins appreciate the feature as it gives management what they need without having to provide access to ConfigMgr directly. The Trend Dashboards all come with weblinks for easy viewing without the viewers having admin rights. Alternatively, IT teams can download the trend graphs and send them to management directly. SysAdmins win by providing the insights demanded by management without needing to hand over full access, and management wins by having clear, easy-to-digest data on endpoints, compliance, and security at their fingertips.
AD Cleanup Trend
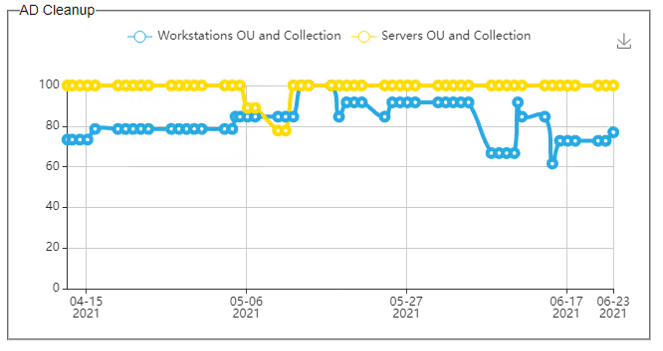
Active Directory (AD) can be one of the biggest beasts to tame in the IT world. Throw ConfigMgr into the mix and you can end up with an even bigger mess on your hands. Getting all the appropriate devices into both AD and SCCM used to be a battle that required comparing lists and then joining the device to missing systems. With the AD Cleanup Trend Dashboard, we put all the tools you need to reach peak compliance right in your ConfigMgr console. You get a full view of what percent of your devices are in both Configuration Manager and AD, as well as a historical view of how far your cleanup efforts have come. Drilling down provides more insight into which devices are missing from which system. Ditch the spreadsheets and get your environment in line with the AD Cleanup Trend Dashboard.
BitLocker Compliance Trend
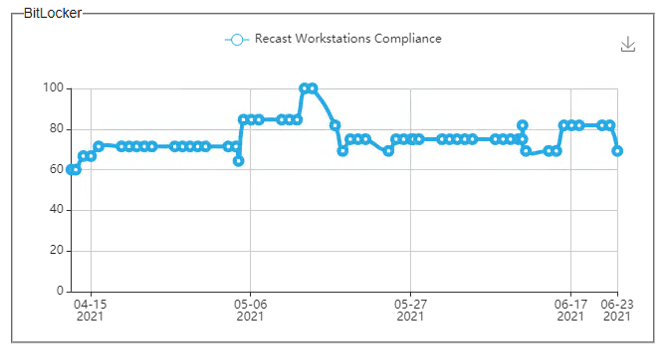
Companies all dread when end users lose their laptop or have it stolen. The loss is made even worse when the stolen device is not properly encrypted. With the BitLocker Compliance Trend Dashboard, you can get a historical view into your compliance level. Your security team will greatly appreciate the ability to quickly navigate to the Trend Dashboard to get a clear read on how many devices are protected and how many still need to be addressed. The dashboards even enable users to drill into each of the data points to identify specific unencrypted devices.
LAPS Compliance Trend
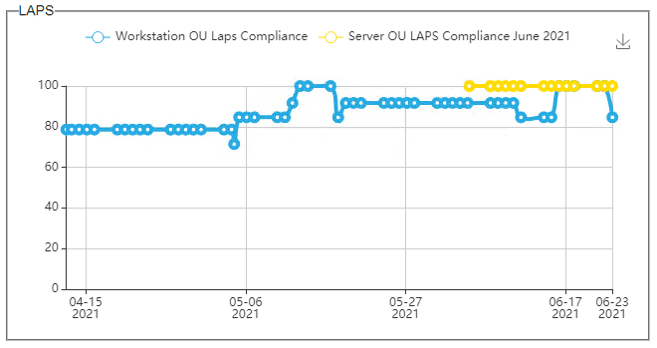
When getting started with Local Admin Password Solution (LAPS), it can be tough to grasp where your company sits. Are all devices getting their password set? How can you tell? The LAPS Compliance Dashboard in Right Click Tools allows companies to gain insight into where they sit now. Then, by setting up a Trend Dashboard for your LAPS compliance, organizations can get a better idea of how far they have come by comparing where they were with where they are today. It helps provide a more complete story of a company’s progress from LAPS implementation to the coveted goal of 100% compliance. The LAPS Trend Dashboard is a great reporting feature to share with management to show your progress, or to find out if you have any machines lagging behind so you can remediate those issues.
Software Updates Trend
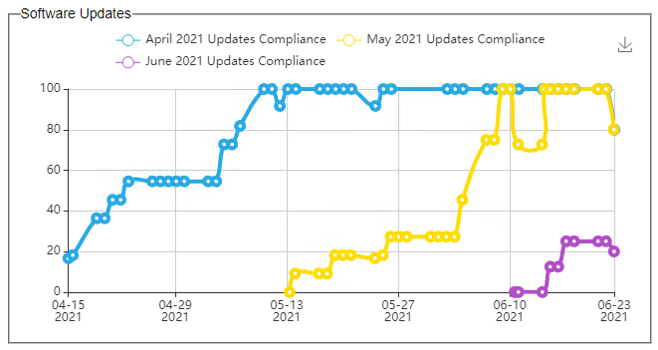
Managing the needs and requests from Security can be a full-time job itself. Staying on top of patching your endpoints poses significant challenges, and then the daily firefighting gets layered on top. The Software Updates Dashboard provides an all-in-one view into the patch compliance level of your endpoints. By setting up a Trend Dashboard for software updates, you can illustrate how quickly patches are applied in your environment and identify any patches that may need an extra push. Again, you can send the Trend Dashboard link to members of your security team so that they can stay up to date on progress without them needing direct access to ConfigMgr.
Trend Dashboards Visualize Compliance
To unlock the full potential of your Right Click Tools Enterprise license and make use of these Trend Dashboards, you will need to have a Recast Management Server with Recast Proxy set up. Learn more about getting your Recast Management Server set up here. This resource has a great step-by-step video.
The post Compliance Tracking with Trend Dashboards appeared first on Recast Software.
]]>The post 5 Ways Right Click Tools Enterprise Saves Organizational Resources appeared first on Recast Software.
]]>Right Click Tools Enterprise provides superior control and automation to greatly reduce the workload when managing a ConfigMgr environment. Below you’ll find 5 ways Right Click Tools Enterprise can streamline your operations.
1: Troubleshooting with Right Click Tools Enterprise
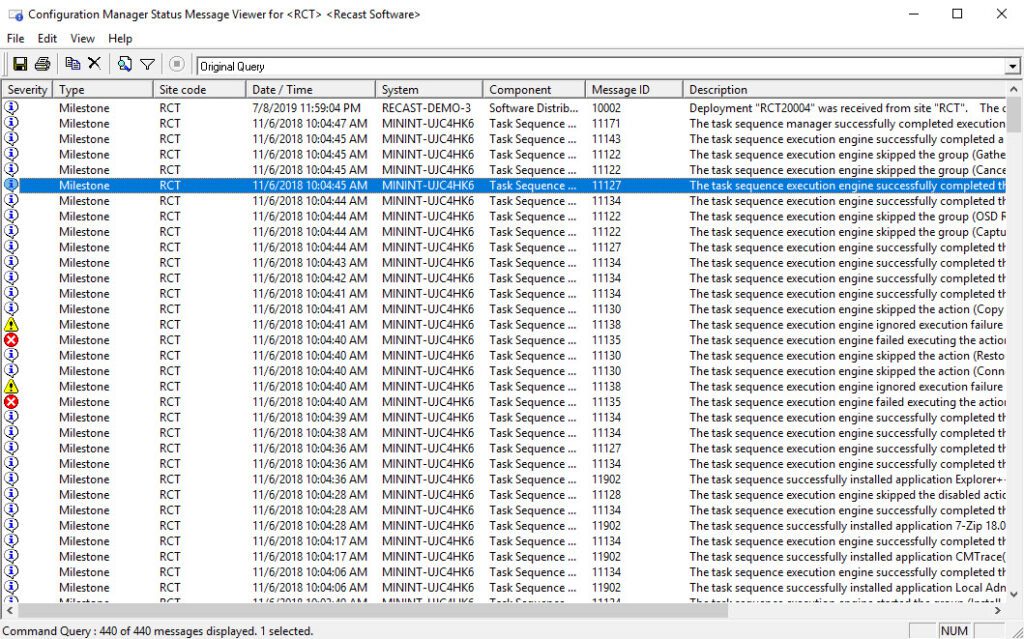
When task sequences and other areas of ConfigMgr fail, it can put a serious time strain on productivity across the organization. Not only is IT productivity stalled while logs and other potential causes are explored, but anyone waiting for a new computer, tech support ticket, or new image has their productivity hamstrung as well. Right Click Tools Enterprise’s Status Message Tools enables admins to jump directly to the causes of trouble in 24 different places around the console, so that they can address issues at an increased rate, saving the organization’s resources.
2: Automation
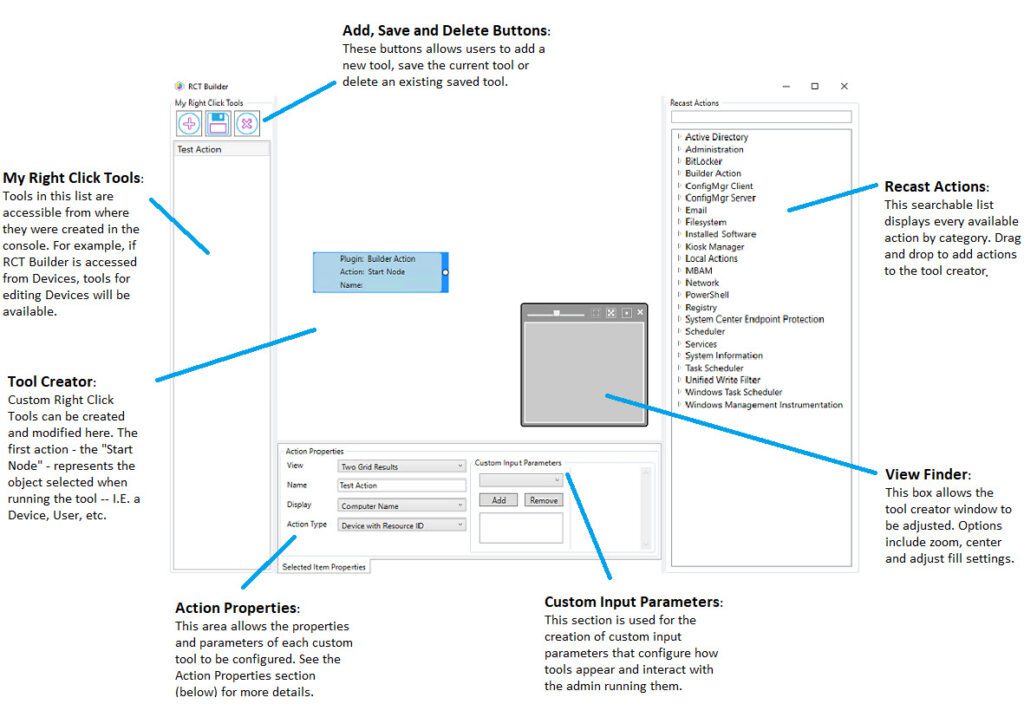
ConfigMgr is one of the largest and most complicated products Microsoft sells, and is used by an organization’s best, brightest, and most experienced (and expensive!) IT resources. Significant organizational resources can be saved by giving these highly skilled professionals the tools they need to offload and automate complex, repetitive, and challenging tasks. Right Click Tools Builder allows the creation of custom organizational automation tools on a grand scale, leaving the most skilled IT resources more time to better manage the constant forward march of technology and potential security threats. Builder allows you to make use of the same tools and actions used to develop Right Click Tools to build customized automations. To make it even easier, Recast Software provides some prebuilt Builder actions available on the documentation page for teams to import and then hit the ground running.
3: Help Desk Enablement using Right Click Tools Enterprise

Right Click Tools Enterprise reduces the skill and knowledge barrier to many common tasks in ConfigMgr. With its robust Role Based Administration model, it enables organizations to safely offload ConfigMgr tasks to those with less experience. Utilizing the Recast Management Server (included with an Enterprise license), IT teams can set roles with only the specific permissions that they wish to give out. This can help to increase the help desk’s response time, while also giving your help desk employees exposure to ConfigMgr without SysAdmins having to worry about them causing undue harm to any systems. This makes the organization more effective at IT administration and helps foster employee growth.
4: Proactive over Reactive
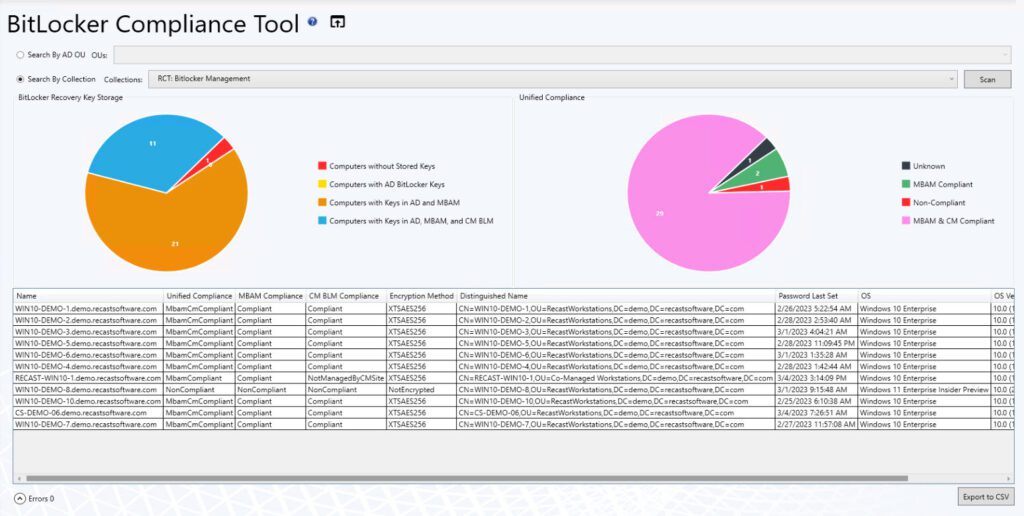
Right Click Tools Enterprise includes several tools designed to help admins become more proactive in their systems management, stopping problems before they occur. The Content Information dashboard gives a clearer picture into the process of managing, updating, and deploying content, letting admins keep task sequence content fresh, thereby reducing update time with the end user. Right Click Tools Security Dashboards allow admins to surface, refine, and act on compliance data for Active Directory vs. ConfigMgr devices, BitLocker and LAPS, and Software Update Deployments. Right Click Tools Querying allows for bigger, more complex queries (without console crashes), with results that can be refined and acted upon immediately.
5: End User Self Help

Unified Write Filter Manager, part of Kiosk Manager, enables end users to self-help when they experience tech support trouble. Simply restarting their machines returns the computer to a healthy and updated state. This allows IT to reduce tech support tickets in areas where they are most likely to cause the most organizational disruption, without forcing IT to create new device management procedures or deploy a host of group policy changes.
Additional Right Click Tools Enterprise Resources
- How to Install Right Click Tools Enterprise
- Right Click Tools Client: Enterprise with Server Deployment
- Right Click Tools Helps Co-Managed Intune and ConfigMgr Environments
- Role-Based Permissions in Right Click Tools Enterprise
- How to Remove Content from Distribution Points with Right Click Tools Enterprise
The post 5 Ways Right Click Tools Enterprise Saves Organizational Resources appeared first on Recast Software.
]]>The post Overview of Microsoft LAPS (Local Administrator Password Solution) appeared first on Recast Software.
]]>“The Local Administrator Password Solution (LAPS) provides management of local account passwords of domain joined computers. Passwords are stored in Active Directory (AD) and protected by ACL, so only eligible users can read it or request its reset.” – Microsoft
The LAPS tool can help reduce the risk of having a default (backdoor perhaps) local administrator and default password on your machines by having each system use a different complex password for the account. Before the LAPS service, most organizations had a generic local administrator account (e.g. ORG_LocalAdmin) with the same password on each machine (e.g. ORG_P@ssword). However, if a machine was compromised using this model, the malware/hacker could move laterally among all your machines gathering more and more data to deepen the security breach. With LAPS software implemented, you remove that attack vector. Now if one machine is compromised, the ability to move and enter laterally to another machine is greatly reduced.
Introducing Windows LAPS
The Evolution of Local Administrator Password Management
As technology evolves, so do the tools that help us manage it. Enter Windows LAPS, an enhanced iteration of the well-established Microsoft LAPS. Unveiled in 2023, Windows LAPS pushes the boundaries of what was previously possible. Windows LAPS retains the foundational benefits of Microsoft LAPS, like randomized local Administrator account passwords, but takes it up several notches. It introduces features like encrypted password storage, Microsoft Entra ID (formerly Azure Active Directory) support, and a historical log of past passwords. Plus, accessibility has improved—you can now directly view these secure passwords within the computer information in Active Directory.
Learn more about Windows LAPS here. Now, back to Microsoft LAPS.
Microsoft LAPS Overview
In this overview of the Microsoft LAPS service, we’ll provide steps on how to:
- Download Microsoft LAPS
- Create Source Folders
- Create End Point Installer Application
- Deploy LAPS Application to Endpoints
- Infrastructure Setup
- Extend AD Schema (from Domain Controller)
- Setup LAPS AD Groups and Permissions
- Verify Permissions and Read / Reset Access
- Enable Group Policy
- Confirm Permissions
What’s Not Covered
- The “why’s” behind each step. Most of these details and the reasons why you must perform these steps are well documented in the Microsoft “LAPS_OperationGuide,” which is part of the download.
- Every deployment scenario. This is a generic, basic lab. While much of this is the same for any environment, each environment is different and each organization is set up uniquely.
What to Consider
- LAPS setup will probably require the involvement of multiple teams (AD / CM / Deployments / GPO)
- Active Directory structure (OUs with workstations)
- Who will have Rights to READ the LAPS Password?
- Who will have Rights to RESET the LAPS Password?
Download Microsoft LAPS
Client Deployment:
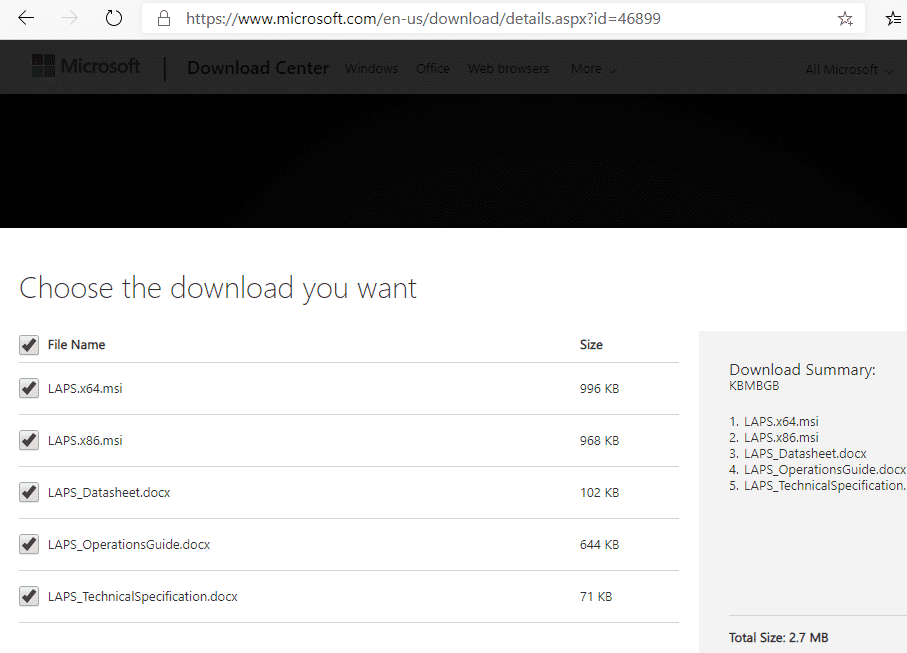
Are you ready to download the LAPS service? The LAPS download link (including client software and docs) can be found here https://www.microsoft.com/en-us/download/details.aspx?id=46899.
Create Source Folders
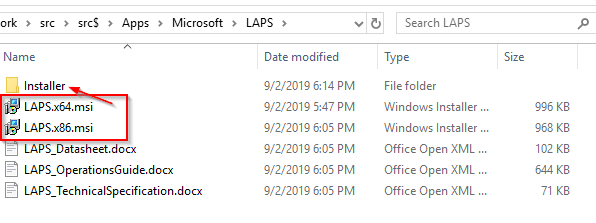
We downloaded all the files into a “LAPS” directory. Then we created a new folder to move the MSI files into.
Create Endpoint Installer Application
In the Configuration Manager (ConfigMgr) console, create a new application. Point it to the x64 version of the MSI.
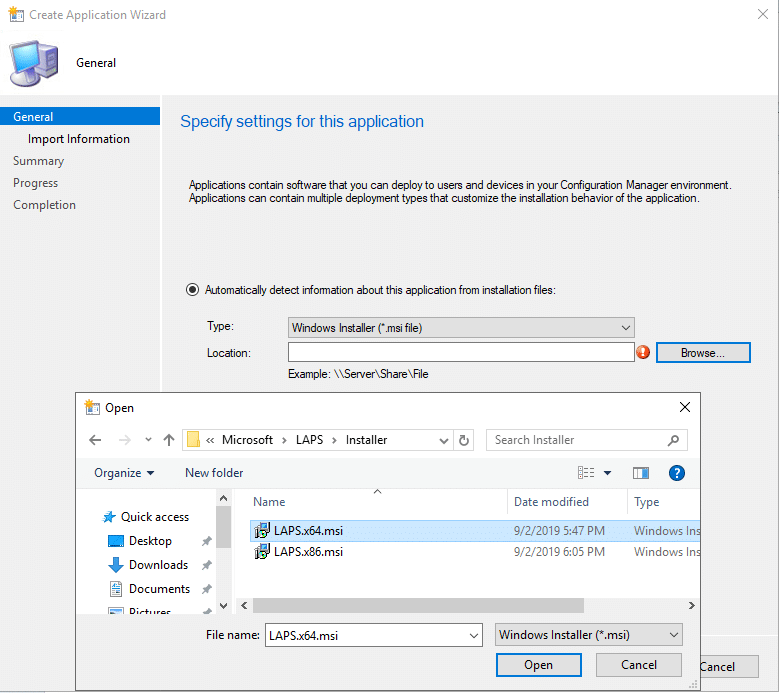
Once you choose the MSI, click on the Open button and then click on Next. The information needed for the application will be pulled from the MSI.
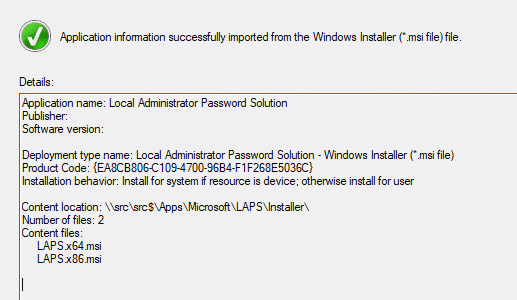
After you click on the Next button, you’ll come to General Information. Add “Microsoft” as the publisher and change /q to /qn.
Click on the Next button. We recommend leaving the defaults until the download process completes and then click Close.
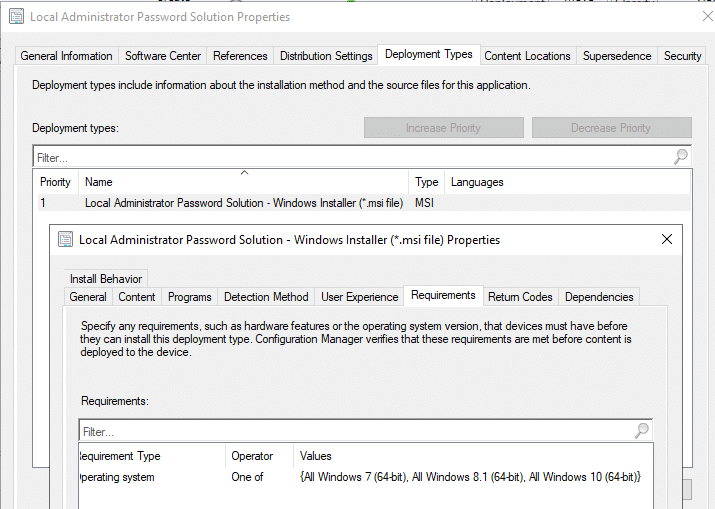
The Local Administrator Password Solution application is now in your console. Only a couple tweaks are required for the program. In the Properties of the application, click on the Deployment Types tab. Choose the Deployment and click Edit. Go into Requirements and add the x64 for versions of Windows in your environment.
Deploying LAPS Application to Endpoints
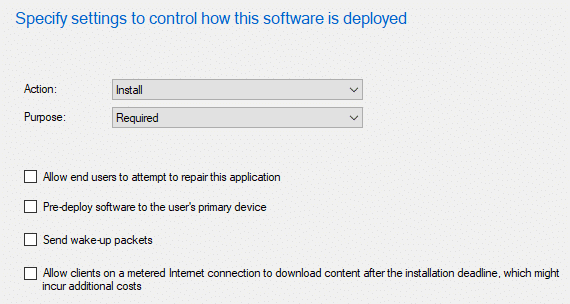
At this point, we have the app, so let’s get it deployed to the workstations. Since we already added the logic into the app, we can safely deploy it to our workstations.
NOTE: This is where knowing your environment is crucial, so make sure you deploy the app to the appropriate collection. Perhaps you have a business reason to not deploy it to all workstations. Use best practices for deployments (maintenance windows, etc.).
The remainder of this example will be generic.

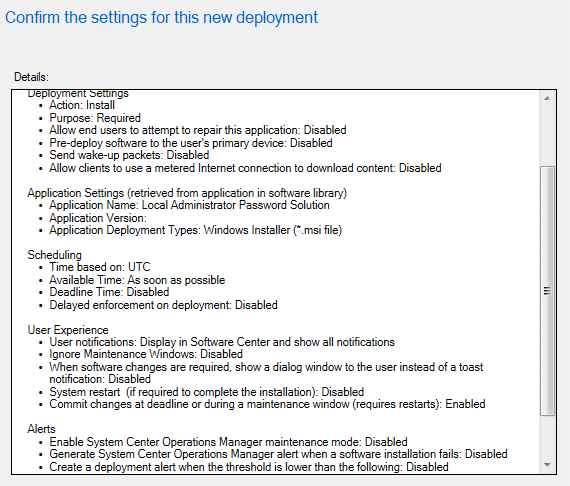
We left the settings for Scheduling, User Experience, and Alerts all set to the defaults (see the screenshot below).
Infrastructure Setup
Admin Client / LAPS Management Client
Now that the client is deployed, let’s setup the infrastructure. First, switch over to a client test machine or your typical admin workstation. We’ll install the LAPS client along with the Management Tools. Once you kick off the installer (double-click on the MSI) click through the first couple screens to get to the Custom Setup screen. Once here, enable all the options.
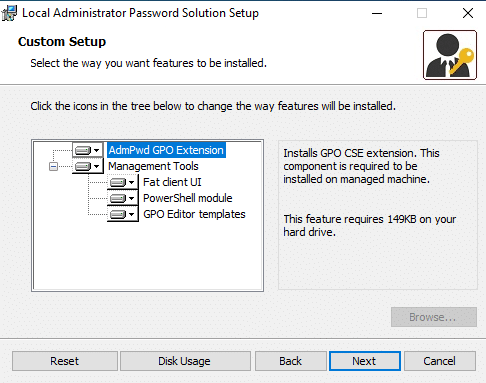
Next, go ahead and install it. You’ll need to grab some of the items it installs and then copy them back out to your source server for easy access.
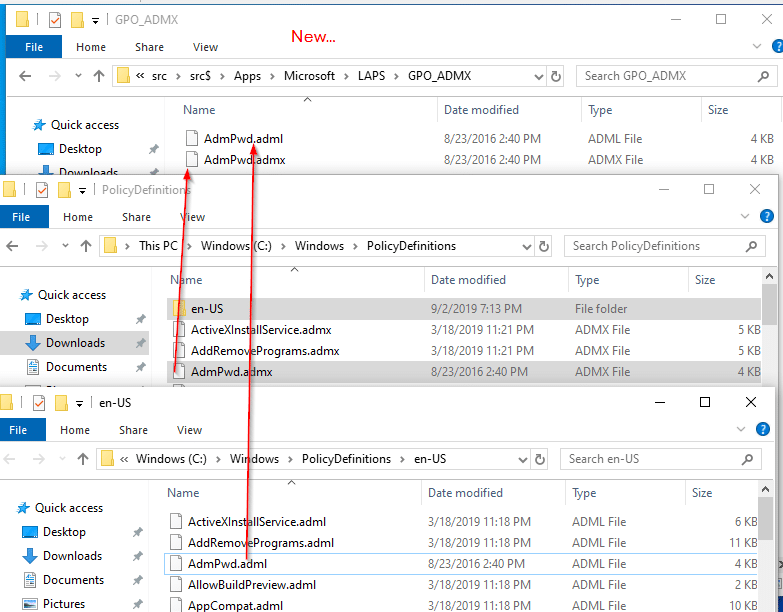
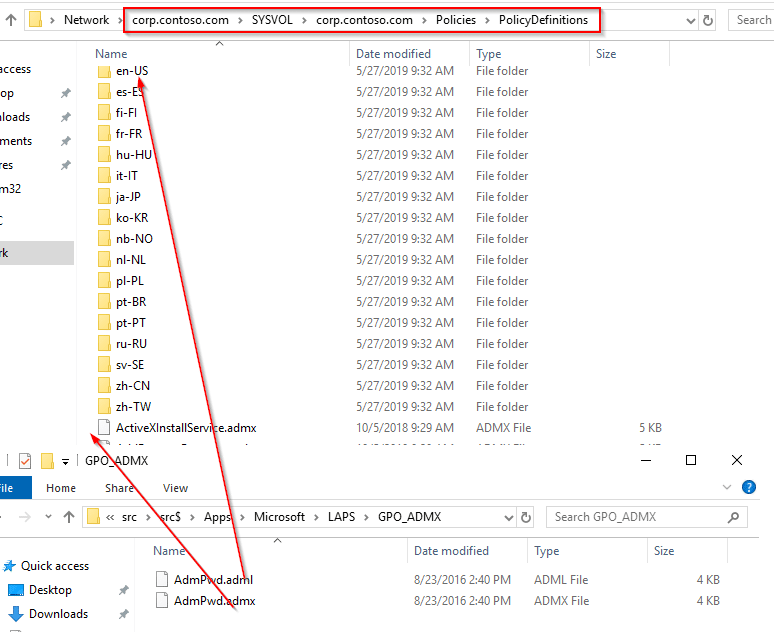
Go to C:WindowsPolicyDefinitions. Here you will grab the AdmPwd.admx file, and the AdmPwd.adml file from the en-US subfolder. We created a folder called GPO_ADMX in our source location to copy them to (see, “New…,” in the screenshot below).
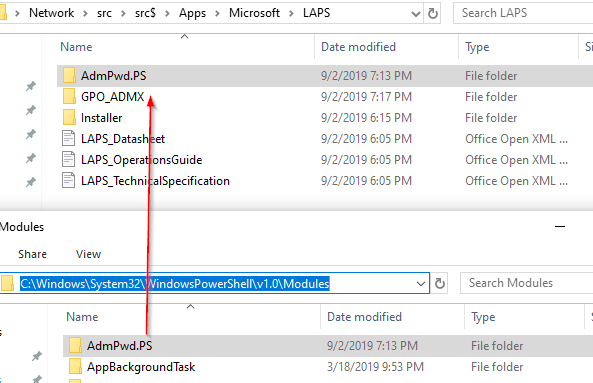
Also, copy the AdmPwd.PS folder from the PowerShell modules: C:WindowsSystem32WindowsPowerShellv1.0Modules
You’ll need all these files later.
Extend AD Schema (from Domain Controller)
Complete the following steps from your workstation. We did it from the actual domain controller (DC) to ensure we had the connection and rights. You’d typically do this from an admin machine with proper credentials. Your DC should be running Windows Server CORE and it should not have a desktop experience. You typically never want to actually log onto a DC. However, this is a lab and demo environment.
Modify the AD Schema
On the domain controller (DC), copy the AdmPwd.PS folder you uploaded to your source into the local module repository on your DC. Next, launch the admin PowerShell console. In the image below, you can see how we tried to Import-Module before copying the files onto the DC. After the copy, the command runs correctly.
Import-Module AdmPwd.PS
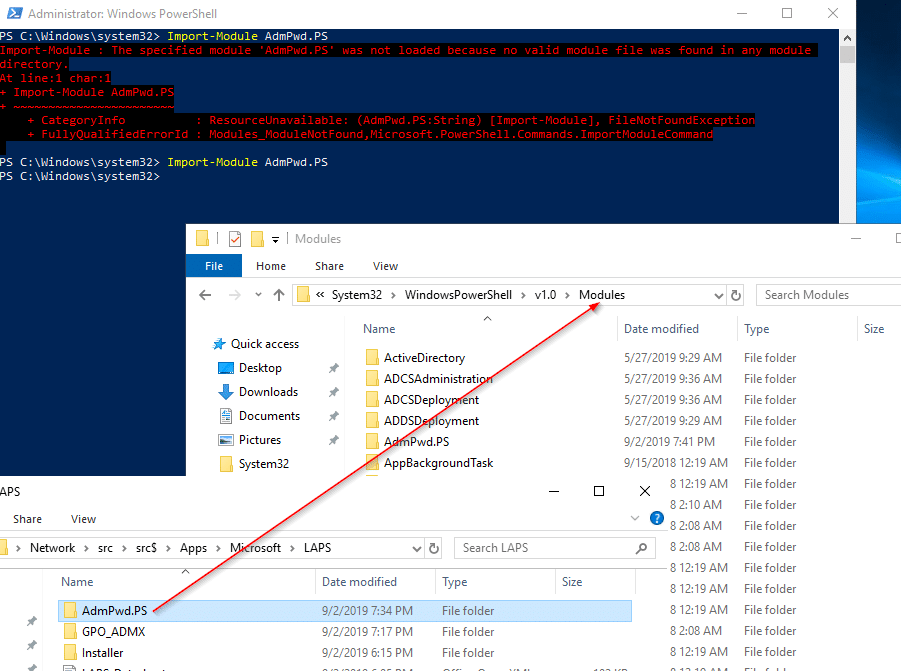
Next, run the command: Update-AdmPwdADSchema
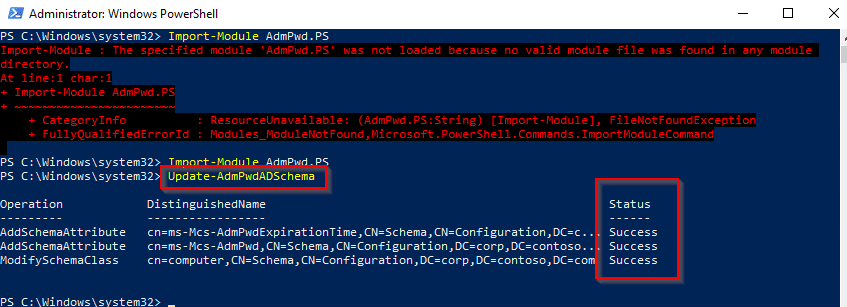
In this lab, you can see it successfully added two attributes and modified one class.
Setup LAPS AD Groups and Permissions
Hopefully you planned a few key details before starting this journey. For example, denote which OU the workstations are in that you want to apply LAPS group policy to, and plan which individuals should have permissions. For this lab, we have one “Master OU” setup for workstations, and all other workstations fall into sub-OUs of that master OU.
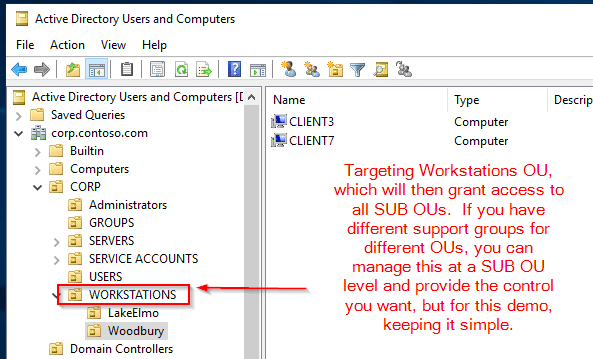
At this point, it’s nice to check and see who has rights to view that info in AD. In your PowerShell console, type: Find-AdmPwdExtendedrights -identity <OU Name> | Format-Table

As you can see, the rights in this lab are clean, and we’re ok with these folks having rights to LAPS.
Now, in AD, let’s set up “Read” and “Reset” groups. This will grant these groups access to LAPS. In the screenshot below, you’ll see that we’ve created two groups: LAPS Read Only and LAPS Reset PWD.
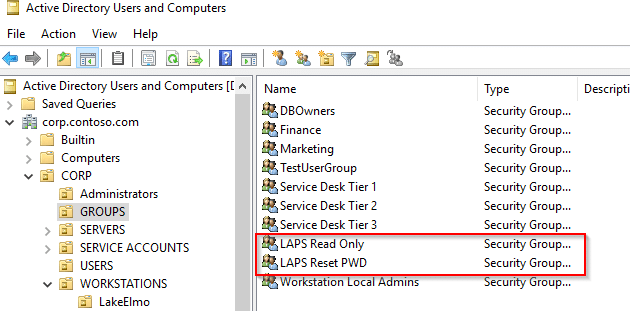
Now we need to grant machines the ability to update their own passwords. We’re going to grant access to the “SELF built-in account” for all machines in the Workstation OU: (Workstations) Set-AdmPwdComputerSelfPermission -OrgUnit <OU Name>

Next, we need to grant users rights to look up that information. This is where we need the newly created groups. Here we’ll give the “LAPS Read Only” group rights to read LAPS passwords: Set-AdmPwdReadPasswordPermission -OrgUnit <OU Name> -AllowedPrincipals <FQDN Group Name>
We’re going to give the “LAPS Reset PWD” group rights to reset LAPS passwords: Set-AdmPwdResetPasswordPermission -OrgUnit <OU Name> -AllowedPrincipals <FQDN Group Name>
Verify Permissions and Read / Reset Access
Let’s confirm this worked by using the Find… command (see the screenshot below).
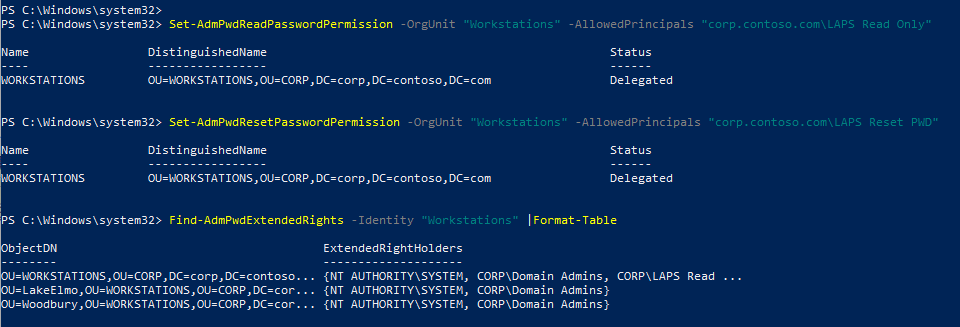
Now, back in AD, nest the groups you want to have access in your LAPS Security Groups.
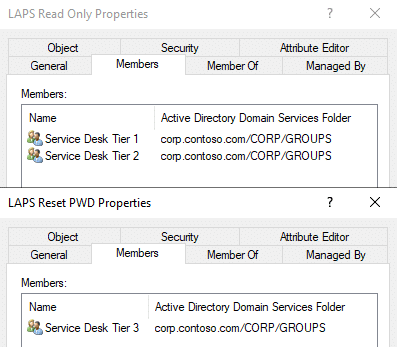
For this lab, we have Service Desk Tier 1 and 2 with read only rights, and Tier 3 can reset.
Enable Group Policy
Copy the ADMX and ADML files you copied to your source folder into your Group Policy Central Store, which can be located here: \FQDNSYSVOLFQDNpolicies
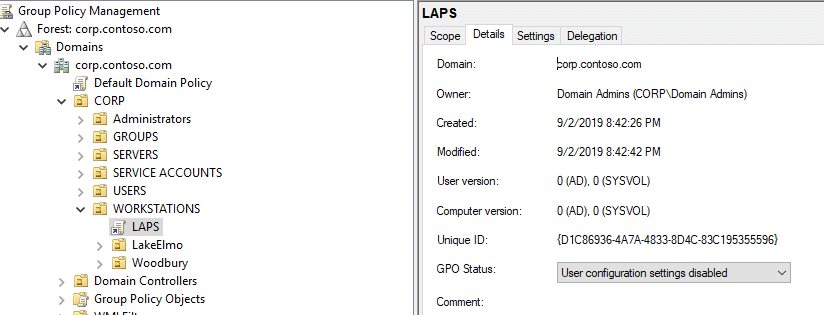
Now we can launch Group Policy and create our LAPS policy. In this demo, we’ll create a new simple policy, but you can always add it into one that already exists. The new GPO is set to the defaults, except we disabled User Policies. We did this because our new policy is all machine-based, so there is no point in having it look for user policies.
We used basic settings to get it working with this lab. In the lab, we have a local admin account on the computer, besides the disabled default, which is named “MyLocalAdmin.” This is the account we want LAPS to manage.
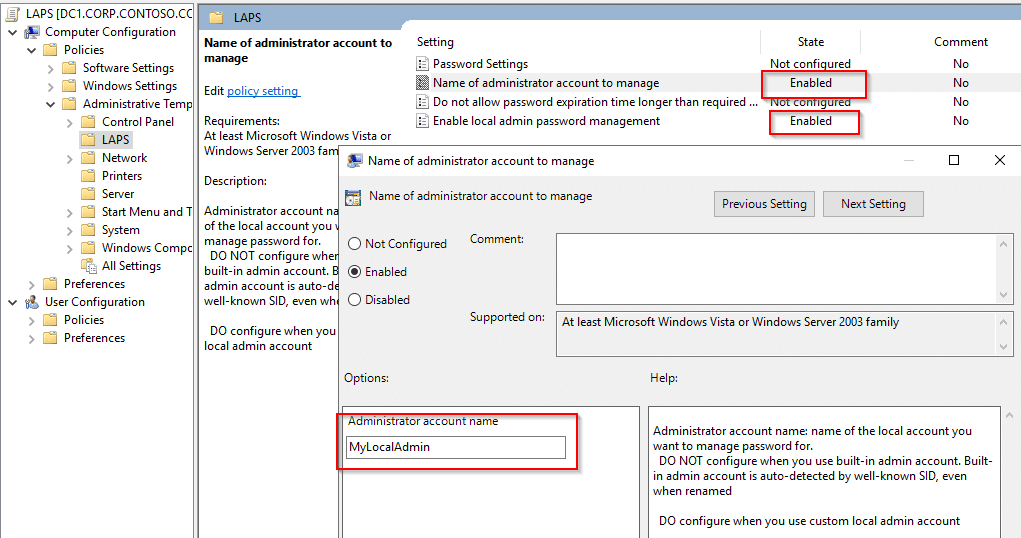
That’s it. Now it’s time to confirm we get the desired results.
Confirm Permissions
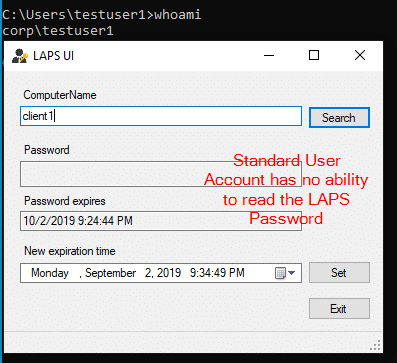
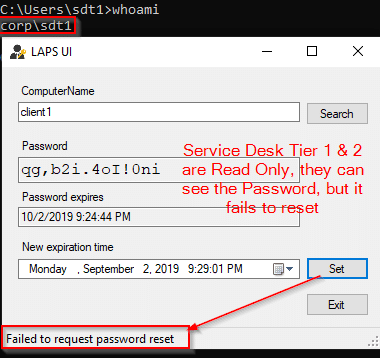
The permission tests we will perform:
- Standard End Users (should have No Rights).
- Service Desk Tier 1 and Tier 2 (should have Read access).
- Service Desk Tier 3 (should have Read and Reset access).
Test 1: Standard User
Test 2: Tier 1 and Tier 2 Service Desk
Test 3: Tier 3 Service Desk
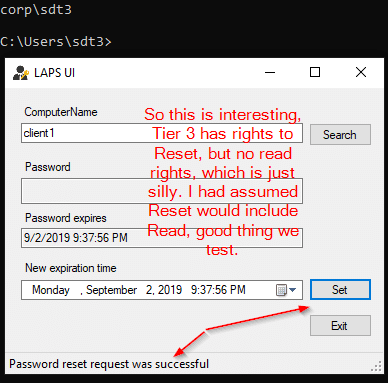
What did we learn from this test? Reset permissions do not include Read. Unless you have a need for a group to be able to reset this password and not read it, we’d recommend nesting the LAPS Reset PWD group inside of the LAPS Read Only group.
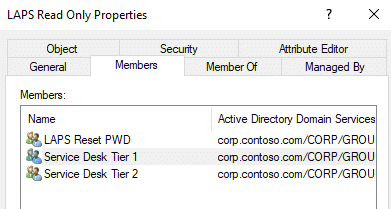
Test again.
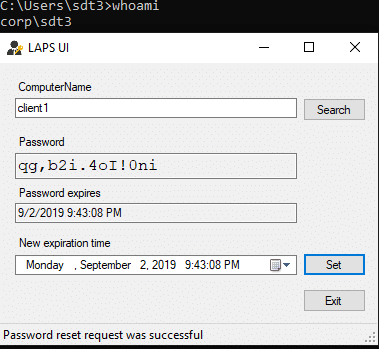
Now we get the desired results. Tier 3 Service Desk can both Read and Reset the LAPS password.
Additional LAPS Information
- Windows LAPS Overview
- How to configure Recast Management Server Users / Groups to view the LAPS Compliance Dashboard in the ConfigMgr console
Microsoft LAPS in Action
After you’ve downloaded and deployed LAPS, Recast Software created a helpful dashboard for you to monitor your LAPS health, bringing visibility to overlooked security necessities. This is included in the Enterprise version of the Right Click Tools.
The Right Click Tools LAPS dashboard keeps LAPS visible and front of mind. It only takes a few seconds to pull it up, check the current stats, and move on. If an anomaly is found, the team can quickly start looking into it. Learn more about the Right Click Tools LAPS Dashboard.
The post Overview of Microsoft LAPS (Local Administrator Password Solution) appeared first on Recast Software.
]]>


